Fundraising in ActionKit? Don’t forget these tips!

There are so many different ways of fundraising with ActionKit. Many clients use ActBlue in combination with ActionKit; others use ActionKit’s donation pages exclusively. Here are some of the most common tips and tricks we recommend when fundraising.

Daisy-chain your pages

People who sign your petitions are on board with your organization. They believe in your mission. Nudge your supporters to take that next step by sending action takers to a donation page!

By default, when a user takes an action on one of your pages, ActionKit will send them to a thank you page, usually with sharing options. But you can configure this instead to send them to a donation page. On the After-action info screen, change the Redirect URL to the URL of one of your donation pages.

By default, ActionKit redirects action takers to a thank you page
Change the Redirect URL to send action takers to the page of your choice, usually a donation page

Set up a Confirmation Email

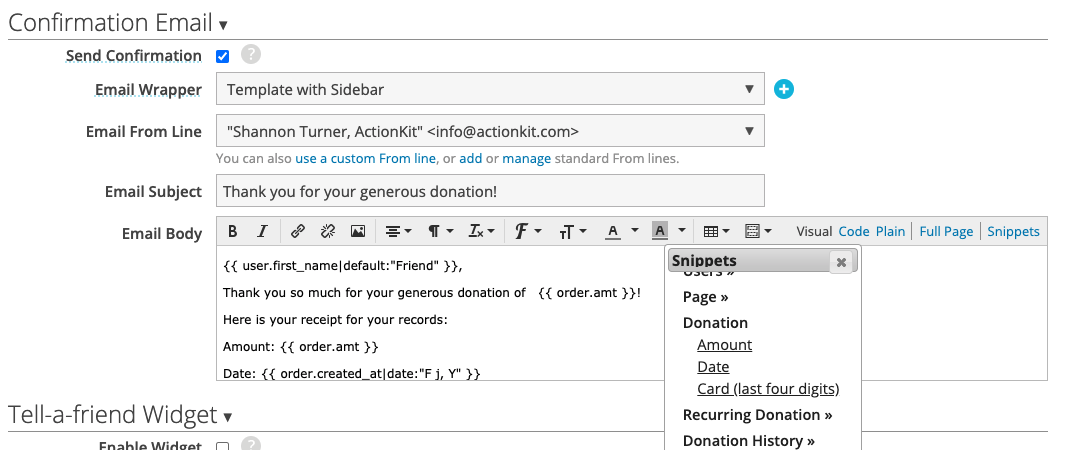
Donors expect a receipt when they donate, and with ActionKit it’s easy to provide one! On the After-action info screen, set your Confirmation Email to include key details about the donation, like the amount and date. (The snippets menu on the Confirmation Email editor has all of these snippets you’ll need).

This confirmation email has all the details users expect, and you can add more customizations using the snippets menu

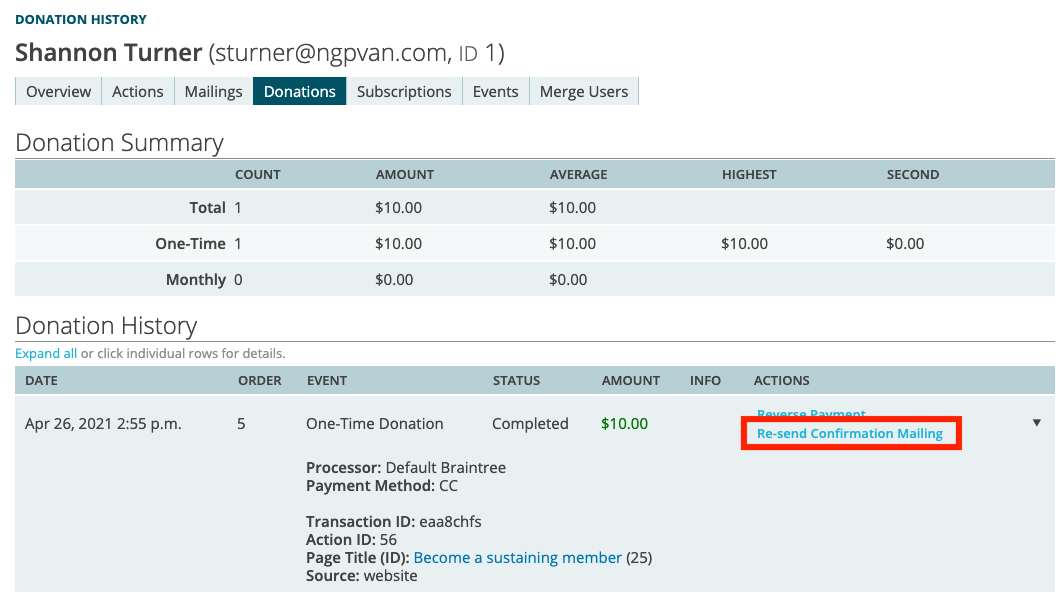
When sending a confirmation email to users about their donations, we store an exact copy of that email in case they don’t have it anymore and need it re-sent to them. You can re-send the confirmation email from a user’s Donation History screen:

You can re-send confirmation emails upon request. Note that this feature is only available for certain types of confirmation mailings, and only for donations made after February 2019, when this feature was introduced.

Use Suggested Ask Snippets

ActionKit allows you to automatically configure what amount of money to ask for based on a user’s previous giving history. We provide some suggested ask rules in ActionKit to help you get started, but you can also customize your own.

Once you have suggested ask rules you’re happy with, you can attach them to a donation page. When you do this, the donation page will automatically use these rules to determine how much to ask for from each user.

On the Action Basics screen of your donation page, you can select a suggested ask rule

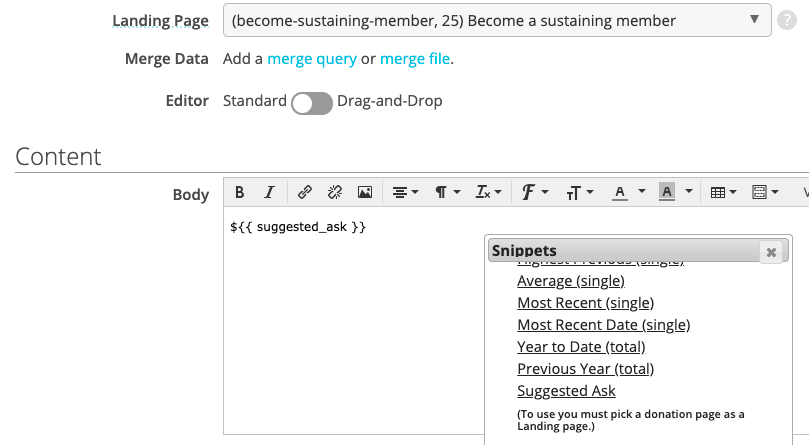
You can also use these suggested ask rules to personalize your mailing content. When you use a donation page that uses a suggested ask rule as your mailing’s landing page, you can take advantage of the suggested_ask snippet.

Select a donation page with a suggested ask rule as your mailing’s landing page in order to use suggested ask snippets

This inserts the ask amount for each user defined by your suggested ask rules.

You can use the suggested ask snippet with ActionKit or ActBlue donation pages. If you’re linking to an ActionKit donation page, the amount for each user will be pre-selected on the page.

With ActBlue, you can use the suggested ask snippet in a URL in order to pre-fill the donation amount. If you want to override all the suggested amounts shown, you can provide the amounts URL parameter with a comma separated list of numbers, like amounts=7,14,21,28,35,42,49 to have the user be able to choose from $7, $14, $21, $28, $35, $42, or $49 rather than the defaults for that page.

This isn’t the only way to do suggested asks, either! One of the things I like most about ActionKit is how there are often many different ways of approaching the same problem. But give that a try — suggested ask rules can be a great way to boost your donations!

Conditional survey questions

Ever want to make survey questions or user form fields appear conditionally based on user responses, so if a user answers in a specific way other follow-up questions become visible?

Here’s one way you can do just that!

First, you’ll want to make sure you’re using a templateset that supports the Custom JS custom page field. (This is a super common way to customize your templates, so we wrote a short post on how to set this up) This will let you write and run Javascript that you can use on your page.

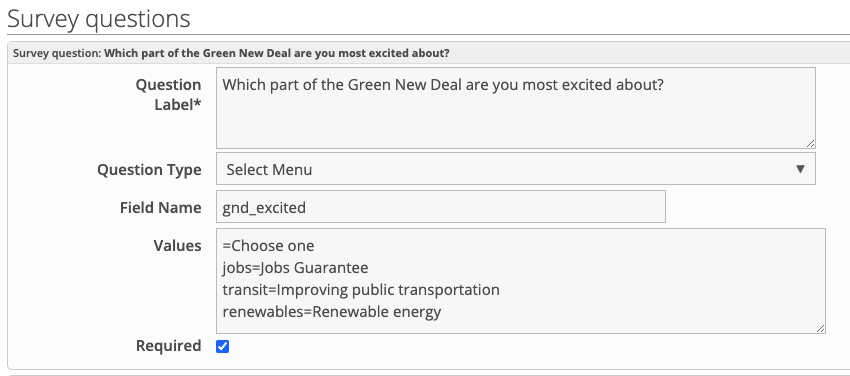
Next, we’ll create all of the survey questions (or user form fields) that we want to appear on the page. Configure them exactly as you like.

For a reference of everything covered in this blog post, you can view a live demo here: https://demo.actionkit.com/survey/we-need-green-new-deal/

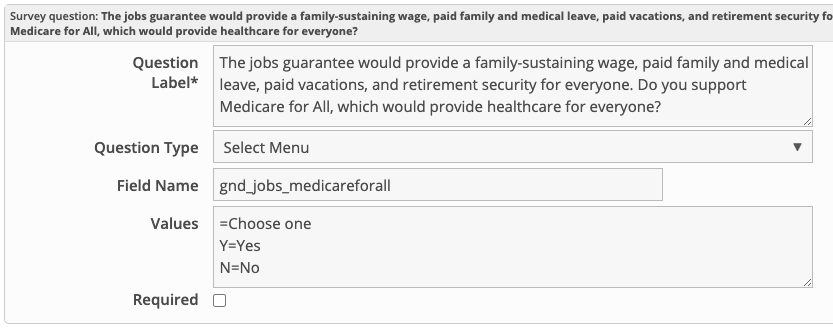
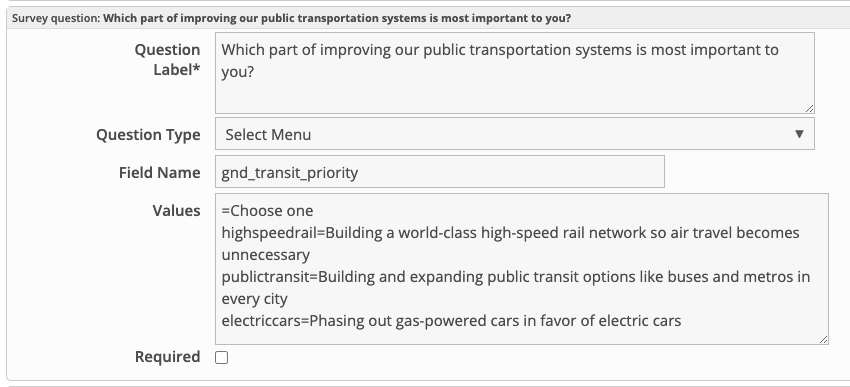
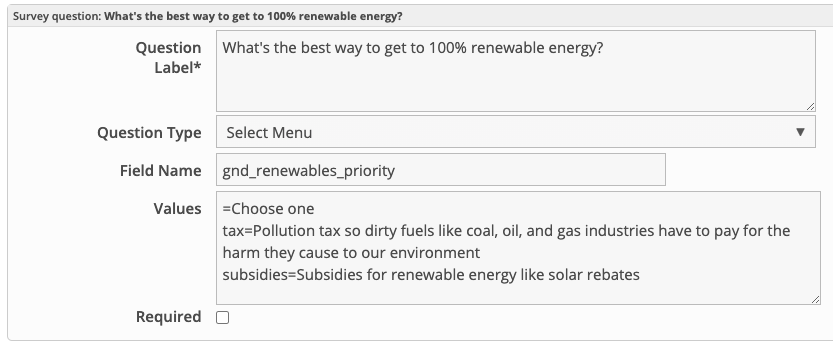
Here’s how I configured the survey questions in this example:

Survey Question 1
Survey Question 1

Survey Question 2
Survey Question 2

Survey Question 3
Survey Question 3

Survey Question 4
Survey Question 4

You can configure your survey questions or user form fields as you like, though you’ll have to make some adjustments to the Javascript code provided below to make sure the field names match.

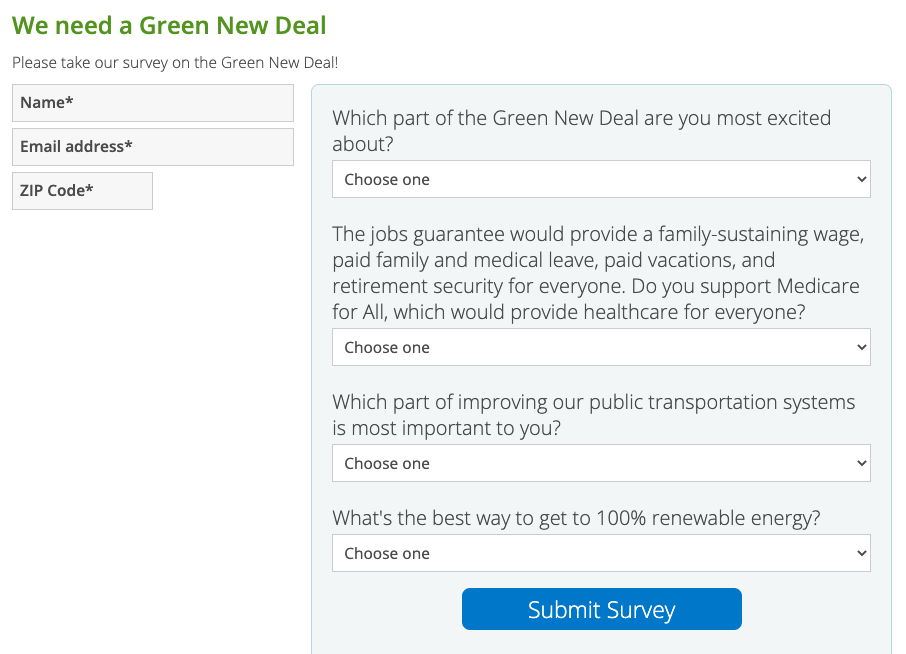
Save your page and view it to make sure all of the fields look exactly the way you want.

The survey page shows all four questions

Once they’re configured, return to the Action basics screen of your page.

Scroll to the bottom and add a Custom JS custom page field.

Custom page field Javascript

Add this code in the Custom JS custom page field and save:

function hideSecondaryQuestions() {
// This hides the secondary survey question questions and their labels.
// Customize this by changing the selectors to match your fields

$('.ak-survey-input[name="action_gnd_jobs_medicareforall"]').hide()
$('.ak-survey-input[name="action_gnd_jobs_medicareforall"]').prev().hide()

$('.ak-survey-input[name="action_gnd_transit_priority"]').hide()
$('.ak-survey-input[name="action_gnd_transit_priority"]').prev().hide()

$('.ak-survey-input[name="action_gnd_renewables_priority"]').hide()
$('.ak-survey-input[name="action_gnd_renewables_priority"]').prev().hide()
}

function showSecondaryQuestions(primary) {
// This shows the secondary survey questions and their labels.
// Customize this by changing the values to match your primary question's values,
// and the selectors to match your secondary questions
if (primary.val() == 'jobs') {
$('.ak-survey-input[name="action_gnd_jobs_medicareforall"]').show()
$('.ak-survey-input[name="action_gnd_jobs_medicareforall"]').prev().show()
}
else if (primary.val() == 'transit') {
$('.ak-survey-input[name="action_gnd_transit_priority"]').show()
$('.ak-survey-input[name="action_gnd_transit_priority"]').prev().show()
}
else if (primary.val() == 'renewables') {
$('.ak-survey-input[name="action_gnd_renewables_priority"]').show()
$('.ak-survey-input[name="action_gnd_renewables_priority"]').prev().show()
}
}

// Hide secondary questions when the page loads
$(hideSecondaryQuestions())

$('#id_action_gnd_excited').on('change', function() {
// When changing the primary question value:
// hide all secondary questions, then show only the ones relating to your choice
hideSecondaryQuestions()
showSecondaryQuestions($(this))
})

Now, when you visit your page you’ll see that only the first survey question appears when you load the page, and when you answer it, the relevant second question appears.

Now survey questions 2-4 have been hidden until you select an answer for question 1

Of course, you can customize your code to reveal more than one question at a time, and if you were clever with your field names or selectors you could show and hide the relevant fields with fewer steps. You could also customize the hideSecondaryQuestions function to clear any existing secondary answers in case a user switches their primary question’s answer.

But this is a good starting point, and we’d love to see what you come up with!
Customizing page function

In a previous post on Customizing page styling, we explored how to add custom CSS code to your pages on a one-off basis.

In this post, we’ll explore how you can make one-off changes to the layout or functionality of your page using Javascript without affecting any of your other pages.

If you’ve found yourself wanting to add custom Javascript to a page to change how a page works (especially to use with ActionKit’s built-in A/B testing!), read on.

(One-time) Create a custom page field

Custom page fields allow you to change the layout or functionality of your pages on a page-by-page basis.

From the Pages tab, choose Other > Custom Page Fields from the sidebar. You’ll then be able to see any custom page fields you have already created.

Let’s add a new custom page field. This is something that you’ll set up once — and then you’ll be able to use it again and again on lots of pages.

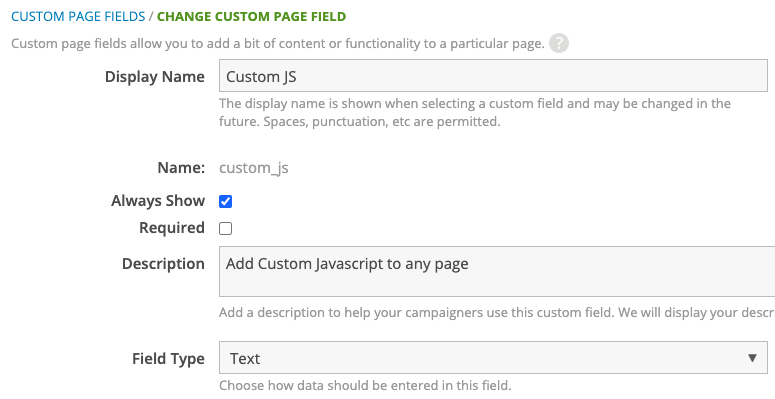
Creating a new custom page field, custom_js

Here, we’ve created a custom page field with the name “Custom JS” and the description “Add Custom Javascript to any page.” We’ll use the “Text” field type.

(One-time) Add the custom page field to your templateset

Like creating a custom page field above, this is a one-time setup step that will help us to customize our pages easily once we’ve set it up.

Caution: Editing templatesets will change the look and feel of every page that uses that templateset, so when making changes to your templatesets, use the Preview feature and test lots of pages to make sure everything looks correct!

From the Pages tab, choose Appearance > Templatesets from the sidebar. You’ll then see all of the templatesets your organization is using.

Find the templateset you want to change and click Edit. You’ll see a list of all of the templates available. We want to make this custom page field available on every page, so scroll to the bottom and open wrapper.html.

Search for a closing </body> tag and add this code just above it:

<script type="text/javascript">
{% if page.custom_fields.custom_js %}
  {{ page.custom_fields.custom_js|safe }}
{% endif %}
</script>

Preview a handful of pages that use this templateset — they should look completely unchanged, since this code asks: “Does this page have anything in the custom page field custom_js? If so, add it in here!” But it won’t do anything until our page itself has something in the custom page field custom_js. We’ll cover that in the next step.

Once you’ve tested several pages and you’re confident that your changes to your templateset didn’t break any existing pages, go ahead and publish your changes.

Note: if you use multiple templatesets and want to add this functionality to each of them, repeat this step for each templateset.

Add the custom page field to your page

Unlike the other steps, this is one you’ll do on each page where you want to customize the functionality or layout.

We’ll use the post on Conditional Survey Questions here as an example since it’s a great illustration of a common thing you might want to do with Javascript on your pages.

Let’s start with a survey page:

The survey page shows all four questions

Notice that there are four survey questions we’ve written here. But what if we want to only show question 2, 3, or 4 based on your answer to the first question?

This is easy to do with Javascript, and now that we can add one-off Javascript code to our pages, let’s dive right in!

On the Action basics screen of your page, scroll to the bottom and expand the Custom Page Fields, then add the field Custom JS.

Custom page field Javascript

In this example, I’m adding the Javascript code from the blog post on using Conditional survey questions . (Read that post for full details about how to set this up)

This will hide questions 2, 3, and 4 — and only show them depending on my answer to the first question.

Once you save your changes, refresh the page and take another look.

Now survey questions 2-4 have been hidden until you select an answer for question 1

This is just one example of how you can change the layout or functionality of your page by adding custom Javascript. Once you have this custom page field set up, there’s no limit to what you can do!

If you combine this with running A/B tests on your pages, you can A/B test any Javascript changes to see which layout and styling changes drive more actions and donations to your pages.

What snippets can I use?

Snippets allow you to customize content on your pages and in your mailings. You can see a full list of snippets that are available and how to use them in the documentation. Another way to look up what snippets are available on your page or mailing, we have a convenience tag called {% log_context %}.

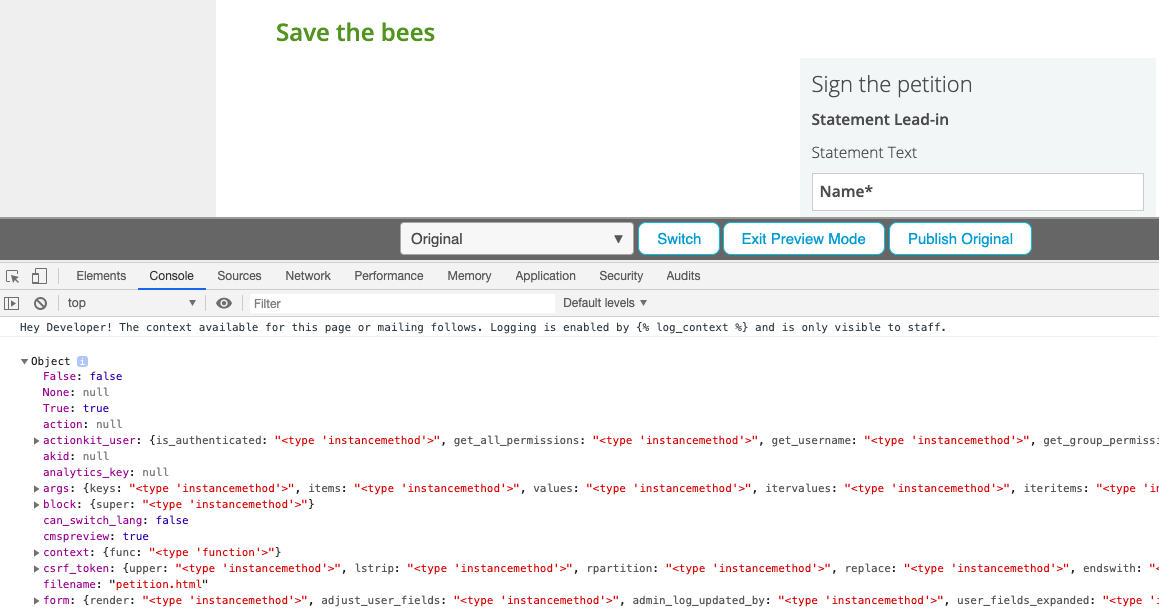
To use {% log_context %} for pages, enter it in some portion of your page text like a statement lead in, then when you’re using the templateset previewer and check the Javascript console in your browser, you can see that there’s an object to leaf through and see what’s available.

{% log_context %} added in the About Text of a page. Note that this text won't appear on the page.
{% log_context %} added in the About Text of a page. Note that this text won’t appear on the page.

Using the templateset previewer, let's take a look at the page we just created, Save the Bees.
Using the templateset previewer, let’s take a look at the page we just created, Save the Bees.

Note that you won’t see the real data itself when using {% log_context %} – it’s intended as a “what’s snippets are available to use on this page or mailing” rather than a key-value store of all of the data. Each of the Object’s keys are the snippets you can use.

When previewing a page using the templateset previewer, check the Javascript console to see the Object created by log_context. Expand to see all of the snippets that are available.

Whenever you see <type ‘instancemethod’>, that’s a sign that you could use a snippet to get more data from it. It’s an instancemethod (rather than the data itself) because we’re doing some work behind the scenes to generate or calculate that data, but at least you know what’s available.

You can also often use .as_dict to get a nice representation of the object (as a representation of a Python dictionary), like {{ page.as_dict }}.

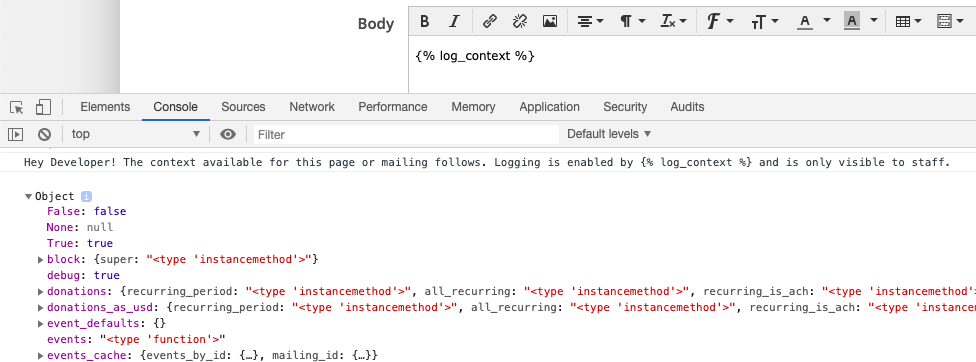
To use {% log_context %} for mailings, include it in your mailing body and then check the Javascript console in your browser to find the object you’ll look through.

Once you've added {% log_context %} to your mailing body, check the Javascript console to see the Object created. Expand to see all of the snippets available.
Once you’ve added {% log_context %} to your mailing body, check the Javascript console to see the Object created. Expand to see all of the snippets available.

Quickly Tag Old Pages and Mailings with Advanced Search + Bulk Edit

Picture this: you’ve got a great tagging system that really works for you and your team, but there’s one problem — all of your old pages and mailings don’t have these tags yet.

This might seem daunting, especially if you have a few years of ActionKit history built up! That’s a lot of pages and mailings to go back and tag if you want to take advantage of using these tags in your reports.

Luckily, there’s an easy way to tag lots of pages and mailings all at once!

We’ll start with pages, but we’ll use the same process for mailings later on.

From the Pages tab, go to Advanced Search in the sidebar.

Once here, start with a search for your pages with the most number of actions. Pages with the highest numbers of actions will give you the most valuable insights — pages with very few actions might be tests that never went very far, like a petition that didn’t make it off the ground.

Using the point-and-click query-builder-style Advanced Search, let’s choose “Number of Actions” and set a number that would indicate good performance for one of your petitions. Here in this screenshot, I’m including 1,000, but you’ll want to adjust that number to something that makes sense for your organization.

Show me pages with at least 1000 actions

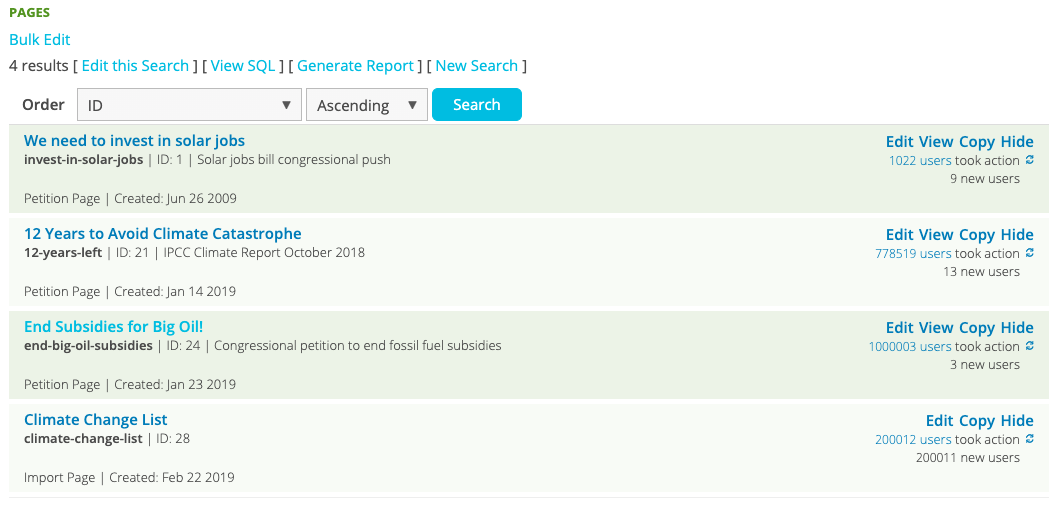
Now we can see all of the pages that had at least 1,000 actions. From here, I could add tags to each of these one by one by clicking Edit:

Results of advanced search for pages with at least 1000 actions

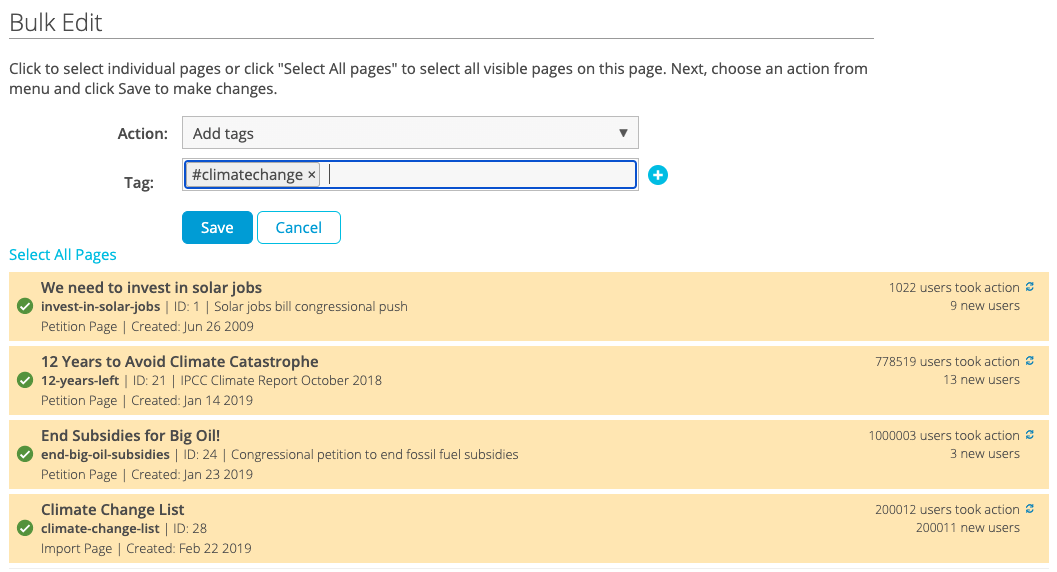
But I can also add tags to multiple pages at a time. By clicking the Bulk Edit link, I can add tags, remove tags, or hide several pages all at once.

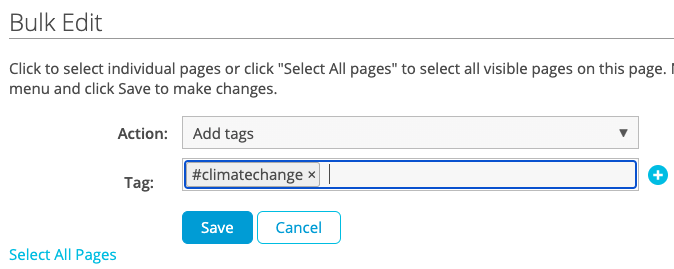
First, choose an action. Since I chose "Add tags", I also want to choose which tags I want to add, so I'll add the tag #climatechange to these pages
First, choose an action. I chose “Add tags” so I also need to choose the tag(s) I want to add.  I’ll add the tag #climatechange to these pages.

Click any row to select one or more pages to apply your tags to
Click any row to select that page.

Or click "Select All Pages" - this is especially useful if you've added more filter criteria so that you're only getting precisely the pages that you want, rather than a generic "pages with at least 1000 actions"
Or click “Select All Pages” – this is especially useful if you’ve added more filter criteria so that you’re only getting precisely the pages that you want, rather than a generic “pages with at least 1000 actions”.

Finally, click Save and confirm that you want to apply the tags to these pages
Finally, click Save, and confirm that you want to apply the tags to these pages.

You can add multiple tags at a time, or even remove tags this way too.

The Advanced Search and Bulk Edit features are also available for Mailings, so you can use this same process to tag your mailings too. In my example screenshot below, I’m searching for mailings that have at least 100,000 recipients.

Show me mailings with at least 100,000 recipients

The Bulk Edit feature allows you to edit as many as 100 pages or mailings at a time, so you’ll have all of your pages and mailings tagged in no time!

Add a Recaptcha Challenge to your Pages

Stopping spammers can be a challenge, but ActionKit offers lots of tools to help you prevent spammers from getting on your list. Typically, spammers will use automated tools to complete forms hundreds or thousands of times very quickly. Some of the more sophisticated spammers will even make the signups look close to real, making it difficult to tell who you should unsubscribe.

One of our best tools for preventing these kinds of spam attacks is the Recaptcha feature, which offers a challenge to visitors to your site that look like these bots (as determined by Google, who in selling ads is in the business of sniffing out automated and fraudulent clicks).

To set up Recaptcha on a page, use the “Recaptcha Enabled” custom page field set to “Enabled”.

Adding the custom page field "Recaptcha Enabled"
Adding the custom page field “Recaptcha Enabled”

Most of your users won’t see a Recaptcha challenge on this page, because they’re legitimate users and not bots. But to test things and make sure everything works, I can adjust my browser settings and pretend to be a bot. This is a bit advanced, but I thought it would be worth showing!

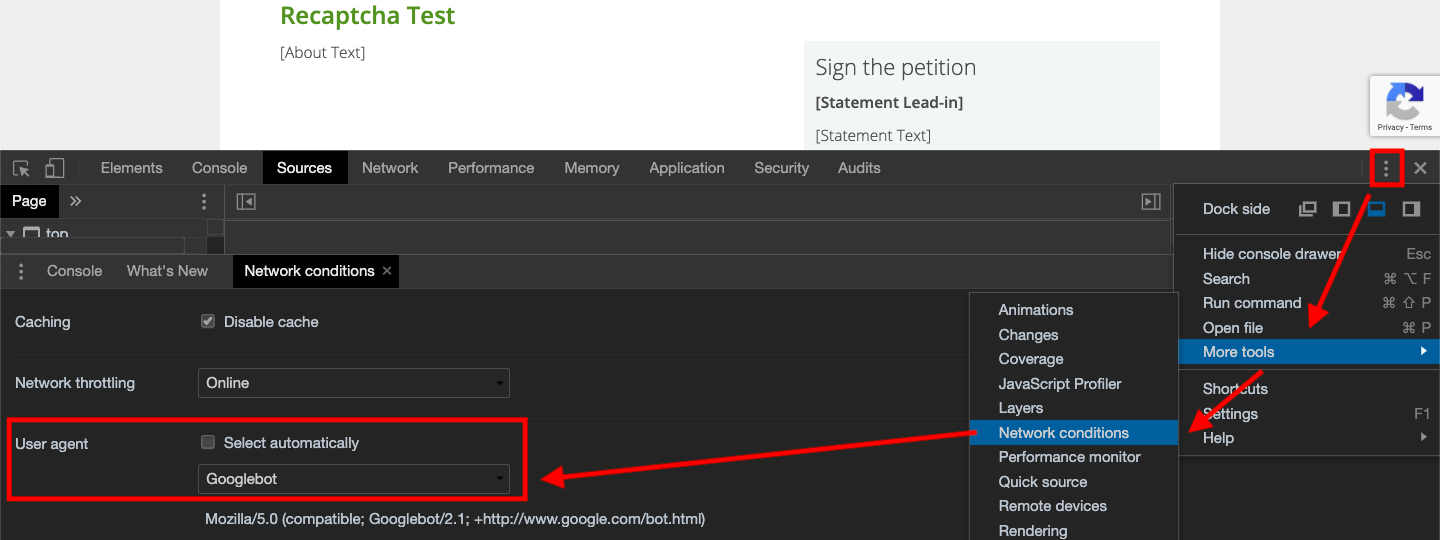
In an Incognito/Private window, I’m going to Right Click > Inspect Element to open my Developer Tools, then click the menu > More Tools > Network Conditions and set my User Agent to “Googlebot”. This will tell any website that I visit “hey, I’m a bot!”

Faking my user agent so Google thinks I'm a bot
Faking my user agent so Google thinks I’m a bot

Next, I’m going to open my page that has the Recaptcha Enabled and complete the form.

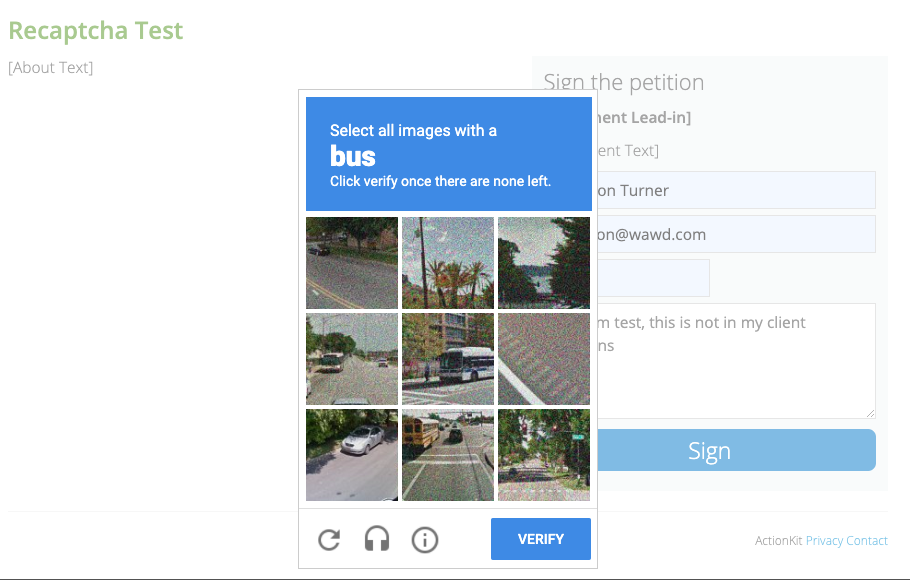
When I do, I’ll get a Recaptcha Challenge. If I fail the challenge, I’ll have to try again. If I successfully complete the challenge, my action will be processed by ActionKit.

Being challenged to identify pictures of a bus to prove I'm a human
Being challenged to identify pictures of a bus to prove I’m a human

Hosting an ActionKit page elsewhere

This works well for most pages, but if you have the “Host Outside ActionKit” checkbox on your page’s Edit Content screen checked, you may have an additional step you need to do in order to get the Recaptcha feature to work: you’ll need to add your website where you are hosting the page to your Client Domains list if it’s not already there.

If you don’t have your website listed in the Client Domains list, your form may fail to process any actions at all.

Embedding a signup form on your homepage

Most clients have a signup form on their home page that allows visitors to quickly sign up for email updates, usually just by giving an email address and/or name, quickly and without leaving the page.

This is a great way to get new users, but it’s also a juicy target for spammers.

When protecting your embedded forms with the Recaptcha feature, there’s a few steps to make sure that your embedded forms work correctly.

First, as above in “Hosting an ActionKit page elsewhere”, you’ll want to make sure that your page’s domain is listed in the Client Domains list if it isn’t already.

Next, you need to make sure that you are including actionkit.js on your page, so that ActionKit can load the necessary code to process a successful recaptcha challenge, for example:

    <script src="https://demo.actionkit.com/resources/actionkit.js"></script>

Heads up! The actionkit.js code requires JQuery 1.8, so if you get a Javascript error saying “$ is not a function”, you need to make sure you’re loading JQuery before you’re loading actionkit.js.

Then you need to include Google’s Recaptcha code to make sure it knows how to create a recaptcha challenge. In your page’s <head> tag, add:

    <script src="https://www.google.com/recaptcha/api.js" async defer></script>

Finally, you’ll need to tell the recaptcha code that it should protect one of your forms. You have a few options for this.

Option 1 – Attach the “invisible” behavior to your submit button:

    <form id="your-form">
        ...
        <script>
        function gotCaptcha() {
          document.getElementById("your-form").submit();
        }
        </script>
        <button class="g-recaptcha" data-callback="gotCaptcha"
        data-sitekey="6LetQiEUAAAAAC5mkK_YsHGJjLE7vxjMTIaNn3MA">Submit</button>
        ...
    </form>

Option 2 – Place the “I am not a robot” checkbox anywhere within your form:

    <form>
      ...
      <div class="g-recaptcha"
        data-sitekey="6LetQiEUAAAAAC5mkK_YsHGJjLE7vxjMTIaNn3MA"></div>
      ...
    </form>

With this option, your form has a “I am not a robot checkbox”. Behind the scenes, Google will determine whether or not the user will need to perform a challenge to complete the action, or if merely affirming “I am not a robot” is good enough.

Now your home page signup form is protected! Make sure you test this carefully, and if you’re getting 400 Bad Request errors, you’re missing a step above. If you run into any problems, reach out via support and we’ll be happy to help!

(Note that the Recaptcha feature doesn’t work well if you have more than one ActionKit form on a page, but we’re evaluating ways to work around this limitation for a future release and will update this post accordingly)

Tracking Visitor Activity with Facebook Pixels

Facebook pixels allow you to track your visitors’ activity on your website. You can view user activity in the Facebook Analytics dashboard and many clients use pixels to see how effective their ads are, tracking activity like viewing a page or making a donation.

You can use Facebook pixels on your ActionKit pages as well! Since each pixel is customized to the specific page and events you’re looking to track, the way we will set things up in this blog post will show how to add a different Facebook pixel to each page.

In a previous blog post, Customizing Page Styling, we created a custom page field and edited our templateset to be able to customize the CSS on our pages however we liked. (If you haven’t edited your templatesets before or created custom page fields, check it out!) We’ll be using the same concepts here.

(One-time) Create your custom page field

Custom page fields allow you to change the layout or functionality of your pages on a page-by-page basis. In this case, custom page fields will allow you to add the necessary Facebook pixel code onto your pages.

From the Pages tab, choose Other > Custom Page Fields from the sidebar. You’ll then be able to see any custom page fields you have already created.

Let’s add a new custom page field. This is something that you’ll set up once — and then you’ll be able to use it again and again on lots of pages.

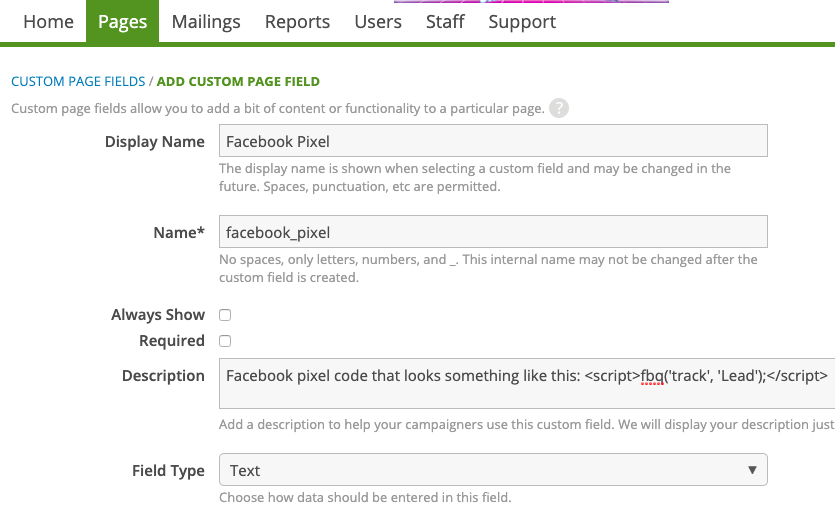
Creating a custom page field for our Facebook pixel

Here, we’ve created a custom page field; lets walk through each piece:

  • Use the name “facebook_pixel”
  • Use the display name “Facebook Pixel”
  • Use the description “Facebook pixel code that looks something like this: <script>fbq('track', 'Lead');</script>” or a similar description to help your colleagues know what to put there.
  • Even though this is technically a bit of Javascript code, be sure to use the “Text” field type (if we used HTML as the field type, we’d get an HTML editor with text formatting options, which would cause problems later).

(One-time) Add your custom page fields to your templateset

Like creating your custom page fields above, this is a one-time setup step that will allow you to add a Facebook pixel on any of your ActionKit pages.

Caution: Editing templatesets will change the look and feel of every page that uses that templateset, so when making changes to your templatesets, use the Preview feature and test lots of pages to make sure everything looks correct! Importantly, the changes you’re making in this blog post, if done correctly, should not result in ANY visible change to your pages.

From the Pages tab in ActionKit, choose Appearance > Templatesets from the sidebar. You’ll see all of the templatesets your organization is using.

Find the templateset you want to change and click Edit. You’ll see a list of all of the templates available. We want to make this custom page field available on every page, so scroll to the bottom and open wrapper.html.

Next, we’ll need the Facebook pixel code. (If you haven’t yet created a Facebook pixel, follow the instructions here.) You can find the pixel base code in the Ads Manager > Events Manager. You can recognize the pixel base code because it starts with <!– Facebook Pixel Code –> and ends with <!– End Facebook Pixel Code –>.

Search for the closing </head> tag in wrapper.html and add the Facebook pixel base code just above it.

Next, find the opening <body> tag and add this code just after it:

{% if page.custom_fields.facebook_pixel %}
{{ page.custom_fields.facebook_pixel|safe }}
{% endif %}

Preview a handful of pages that use this templateset — they should look completely unchanged. These changes alone won’t do anything until our page itself has the Facebook pixel code in the custom page field we created, and Facebook pixels aren’t visible in any case. We’ll cover how to add the pixel code in the next step.

Once you’ve tested several pages and you’re confident that your changes to your templateset didn’t break any existing pages, go ahead and publish your changes.

Note: if you use multiple templatesets and want to add this functionality to each of them, repeat this step for each templateset.

(Each time) Get the pixel code from Facebook and add it to your page’s custom field

When setting up your pixel in Facebook, you’ll need to choose which events you want to track. When you do, you’ll get a snippet of code that you’ll need to put on your page.

Typically the tracking code looks a little something like this: <script>fbq('track', 'Lead');</script> — but there are so many options available for tracking different actions on a page, and you can even make your own custom events.

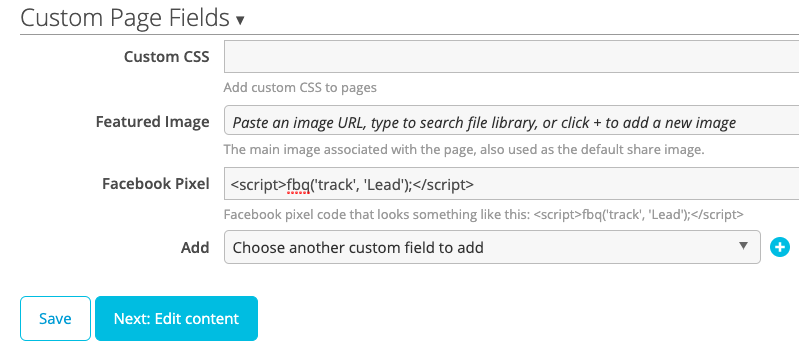
Once you have that tracking code, open your page in ActionKit and go to the Action basics screen. At the bottom, under Custom Page Fields, add your Facebook Pixel custom page field and paste the tracking code in.

Adding our Facebook pixel custom page field to our page on the Action basics screen

Save your page, then test to make sure your pixel is working correctly. Now you’re ready to use your pixel!

Built-in Report Feature: Compare Mailings

Whenever you need to compare two or more mailings, you might be tempted to write a report. But did you know there’s a built-in report that compare the mailings for you?

Look for the “Compare Mailings” button on both the Mailings tab and the Reports tab in the sidebar.

Search for the mailings you’d like to include in your comparison:

Compare Mailings: Search for mailings to compare

You’ll see a summary of Opens, Clicks, and Actions for each mailing in your comparison:

A summary of opens, clicks, and actions

If you see black and grey bars in your metrics like in the screenshot above, this is showing how confident we are that the difference in performance between the mailings is statistically significant.

Scrolling down a bit, we can also see other statistics like forwards and new users:

Forwards and new users

If you’re running a test, you can select a winner from this screen, too:

Select a winner
Select a winner

Don’t be afraid to select a winning mailing — it won’t go out the door without your approval. All clicking the “Select” button does is:

  • Creates a copy of the selected mailing
  • Keeps your previous targeting (if you’re using a test group this ensures the mailings in your test have the same targeting; otherwise you should enforce this manually)
  • Excludes test recipients
  • Removes the limit

So all you need to do is double-check the count before hitting send.

The Compare Mailings report is great for collaboration, too! If you want to share this report with your colleagues, you can email them the URL and they’ll see the exact same report as you.

Adjusting sender name based on region

If you send a lot of mailings, you’ve probably used snippets to personalize your email content. There’s dozens of different snippets available covering everything from personal information about a user like their name and location, their donation and action history, nearby events, and even their representatives.

You can also use conditional content to further personalize email content. For example, you could display different content based on which state a person lives in, or the value for a specific custom user field.

Merge queries give you even more power and flexibility by allowing you to personalize your mailings with ANY information in your ActionKit database. If you can retrieve it in a report, you can use it in a mailing, and that’s especially powerful when you write a report to calculate information from the database.

ONE.org put together a merge query they use in a mailing that helps them send to users in at 7PM in their local time zone if they live in the US or Canada, and 6pm GMT for the rest of the world. It also allows them to personalize their from line based on where the user lives:

select u.id as user_id, l.timezone as timezone,
CASE
WHEN u.country IN ('United States','Canada')
THEN convert_tz(timestamp(date(curdate()), maketime(19,00, 0)), coalesce('US/Eastern', "UTC"), "UTC")
ELSE timestamp(curdate(), maketime(18,00, 0))
END as send_time,
CASE
WHEN country = 'canada' THEN 'Paul Galipeau, ONE.org'
WHEN country = 'united states' THEN 'Brett Jacobson, ONE.org'
WHEN country = 'united kingdom' THEN 'Jasmine Wakeel, ONE.org'
WHEN country IN ('algeria','angola','benin','botswana','burkina faso','burundi','cameroon','cape verde','central african republic','chad','republic of the congo','democratic republic of the congo','côte d\'ivoire','djibouti','egypt','equatorial guinea','eritrea','ethiopia','gabon','gambia','ghana','guinea','guinea-bissau','kenya','lesotho','liberia','libya','madagascar','malawi','mali','mauritania','mauritius','morocco','mozambique','namibia','niger','nigeria','rwanda','sao tome and principe','senegal','seychelles','sierra leone','somalia','south africa','south sudan','sudan','swaziland','tanzania','togo','tunisia','uganda','zambia','zimbabwe','comoros','são tomé and príncipe')
THEN 'Sonia Kwami, ONE.org'
WHEN country NOT IN ('germany','france','netherlands','united states','united kingdom','canada','algeria','angola','benin','botswana','burkina faso','burundi','cameroon','cape verde','central african republic','chad','republic of the congo','democratic republic of the congo','côte d\'ivoire','djibouti','egypt','equatorial guinea','eritrea','ethiopia','gabon','gambia','ghana','guinea','guinea-bissau','kenya','lesotho','liberia','libya','madagascar','malawi','mali','mauritania','mauritius','morocco','mozambique','namibia','niger','nigeria','rwanda','sao tome and principe','senegal','seychelles','sierra leone','somalia','south africa','south sudan','sudan','swaziland','tanzania','togo','tunisia','uganda','zambia','zimbabwe')
THEN 'Caterina Scuderi, ONE.org'
ELSE 'Caterina Scuderi, ONE.org'
END as english_sender_name
from core_user u
join core_location l on (u.id = l.user_id)

Using this merge query in a mailing, campaigners can use {{ query.english_sender_name }} to insert the customized sender name. Users in the United States will get an email from “Brett Jacobson, ONE.org,” and those in the United Kingdom will get an email from “Jasmine Wakeel, ONE.org.”

That’s a fairly complicated report — but there are so many different ways to use merge queries to personalize your mailings! How have you used merge queries to personalize your mailings? Open a support ticket and let us know — we’d love to see what you’ve come up with!

Adding Charts to Dashboards

If you’ve built a lot of dashboards in ActionKit, you know that dashboards allow you to display information from one or more reports and format it any way you like.

ActionKit comes standard with many useful built-in dashboards, and you may notice that some of them display interactive charts, graphs, and even maps.

If you’d like to be able to make charts, graphs, and maps out of your data, it’s easier than you might think!

First, let’s take a look at how the built-in “Action Rates: Your Monthly Progress Report” dashboard creates its chart:

Action Rates: Your Monthly Progress Dashboard

From your Reports tab, search for “Action Rates: Your Monthly Progress Report” and edit it. First thing you’ll see is some Javascript setting the title and axis titles for the chart, but strictly speaking, they’re not necessary.

The code that displays the results of the report is {{ reports.progress_actions_chart }}, and wrapping that in a div with the special classes google-chart and ColumnChart transforms it into the chart we see:

<div id="actionsByMonthChart" class="google-chart ColumnChart" style="height: 500px">
{{ reports.progress_actions_chart }}
</div>

You’re not limited to ColumnCharts, either – you can use many of the charts in the Google Chart gallery just by changing the div’s class to any of the following: AreaChart, BarChart, ColumnChart, GeoChart, LineChart, PieChart, and Table.

For example, by changing the ‘ColumnChart’ class to ‘LineChart’ in the above code snippet, we get a different chart type in our dashboard:

<div id="actionsByMonthChart" class="google-chart LineChart" style="height: 500px">
{{ reports.progress_actions_chart }}
</div>

So your chart would look something like this:

Action Rates as a Line Chart

So next time you’re creating a dashboard, try displaying your results as a chart instead!