Stopping spammers can be a challenge, but ActionKit offers lots of tools to help you prevent spammers from getting on your list. Typically, spammers will use automated tools to complete forms hundreds or thousands of times very quickly. Some of the more sophisticated spammers will even make the signups look close to real, making it difficult to tell who you should unsubscribe.
One of our best tools for preventing these kinds of spam attacks is the Recaptcha feature, which offers a challenge to visitors to your site that look like these bots (as determined by Google, who in selling ads is in the business of sniffing out automated and fraudulent clicks).
To set up Recaptcha on a page, use the “Recaptcha Enabled” custom page field set to “Enabled”.

Most of your users won’t see a Recaptcha challenge on this page, because they’re legitimate users and not bots. But to test things and make sure everything works, I can adjust my browser settings and pretend to be a bot. This is a bit advanced, but I thought it would be worth showing!
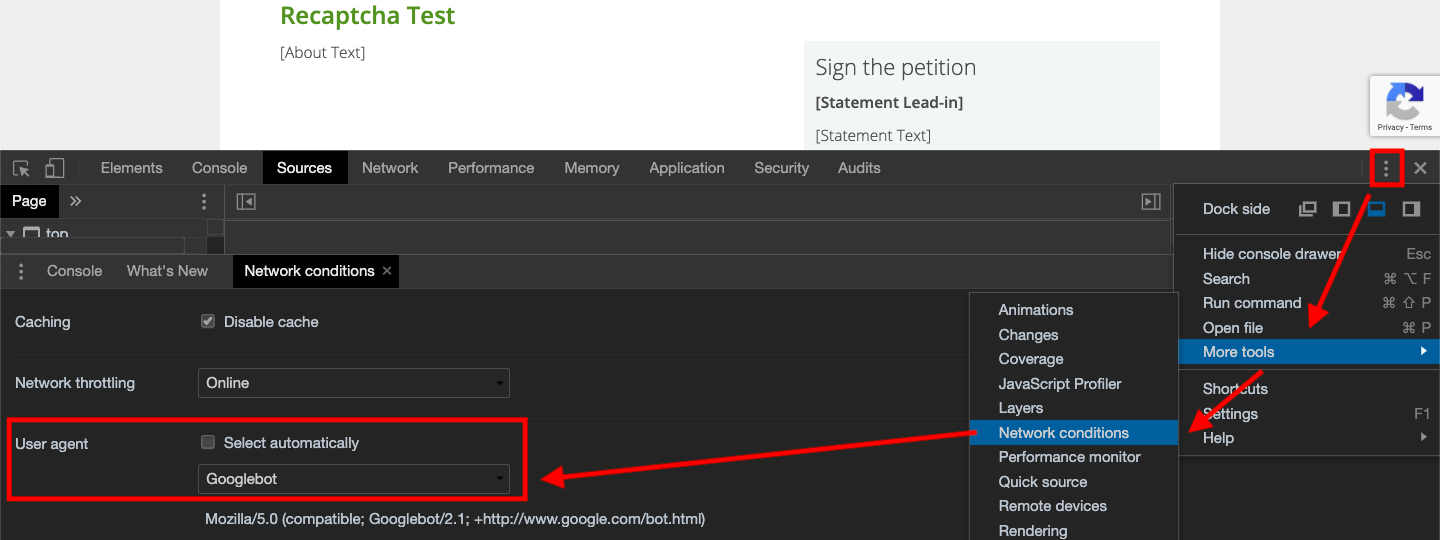
In an Incognito/Private window, I’m going to Right Click > Inspect Element to open my Developer Tools, then click the menu > More Tools > Network Conditions and set my User Agent to “Googlebot”. This will tell any website that I visit “hey, I’m a bot!”

Next, I’m going to open my page that has the Recaptcha Enabled and complete the form.
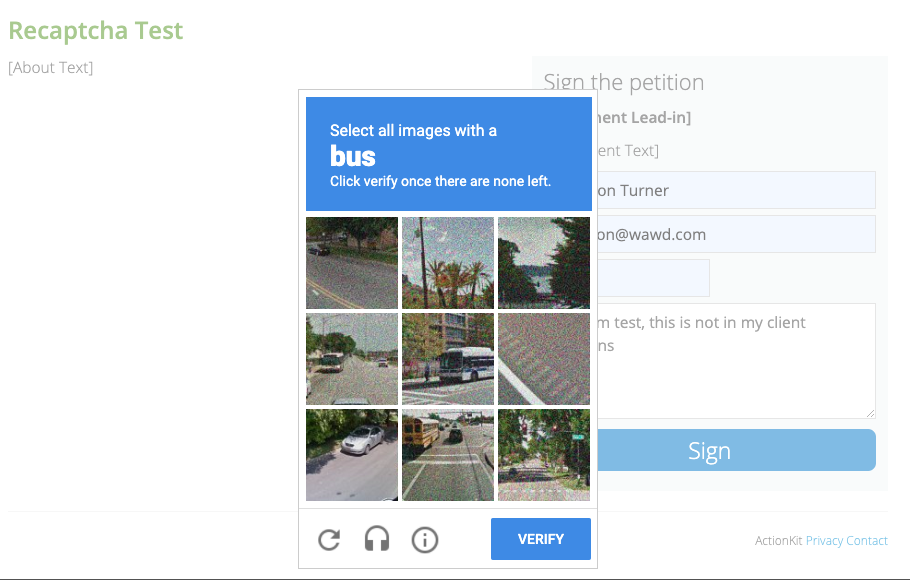
When I do, I’ll get a Recaptcha Challenge. If I fail the challenge, I’ll have to try again. If I successfully complete the challenge, my action will be processed by ActionKit.

Hosting an ActionKit page elsewhere
This works well for most pages, but if you have the “Host Outside ActionKit” checkbox on your page’s Edit Content screen checked, you may have an additional step you need to do in order to get the Recaptcha feature to work: you’ll need to add your website where you are hosting the page to your Client Domains list if it’s not already there.
If you don’t have your website listed in the Client Domains list, your form may fail to process any actions at all.
Embedding a signup form on your homepage
Most clients have a signup form on their home page that allows visitors to quickly sign up for email updates, usually just by giving an email address and/or name, quickly and without leaving the page.
This is a great way to get new users, but it’s also a juicy target for spammers.
When protecting your embedded forms with the Recaptcha feature, there’s a few steps to make sure that your embedded forms work correctly.
First, as above in “Hosting an ActionKit page elsewhere”, you’ll want to make sure that your page’s domain is listed in the Client Domains list if it isn’t already.
Next, you need to make sure that you are including actionkit.js on your page, so that ActionKit can load the necessary code to process a successful recaptcha challenge, for example:
<script src="https://demo.actionkit.com/resources/actionkit.js"></script>
Heads up! The actionkit.js code requires JQuery 1.8, so if you get a Javascript error saying “$ is not a function”, you need to make sure you’re loading JQuery before you’re loading actionkit.js.
Then you need to include Google’s Recaptcha code to make sure it knows how to create a recaptcha challenge. In your page’s <head> tag, add:
<script src="https://www.google.com/recaptcha/api.js" async defer></script>
Finally, you’ll need to tell the recaptcha code that it should protect one of your forms. You have a few options for this.
Option 1 – Attach the “invisible” behavior to your submit button:
    <form id="your-form">
        ...
        <script>
        function gotCaptcha() {
          document.getElementById("your-form").submit();
        }
        </script>
        <button class="g-recaptcha" data-callback="gotCaptcha"
        data-sitekey="6LetQiEUAAAAAC5mkK_YsHGJjLE7vxjMTIaNn3MA">Submit</button>
        ...
    </form>
Option 2 – Place the “I am not a robot” checkbox anywhere within your form:
    <form>
      ...
      <div class="g-recaptcha"
        data-sitekey="6LetQiEUAAAAAC5mkK_YsHGJjLE7vxjMTIaNn3MA"></div>
      ...
    </form>
With this option, your form has a “I am not a robot checkbox”. Behind the scenes, Google will determine whether or not the user will need to perform a challenge to complete the action, or if merely affirming “I am not a robot” is good enough.
Now your home page signup form is protected! Make sure you test this carefully, and if you’re getting 400 Bad Request errors, you’re missing a step above. If you run into any problems, reach out via support and we’ll be happy to help!
(Note that the Recaptcha feature doesn’t work well if you have more than one ActionKit form on a page, but we’re evaluating ways to work around this limitation for a future release and will update this post accordingly)
Interested in scheduling a demo with ActionKit? Let us know!
