In the training Get Ready for End of Year Giving 2025, I covered some tips on personalizing mailing content, segmentation, and deliverability.
During the deliverability section, I demoed a dashboard report that would show your sending volume by mailbox provider over the last 90 days, to help you identify spikes in your sending volume that can lead to deliverability problems.
We’ll add that dashboard report as a built-in in a future version of ActionKit, but if you don’t want to wait, you can do it now. Here’s how.
First, create a query report using custom SQL:
name: Mailings Sent by day by Mailbox Provider
short_name: mailings_sent_by_day_by_provider
description: For use in the "Daily Send Counts by Mailbox Provider" dashboard
sql:
    WITH
        -- List of ALL dates, for pivot report columns
        dates_in_range AS (
            SELECT DATE(now()-INTERVAL `number` DAY) AS a_date
            FROM numeric_9999
            WHERE `number` <= {n_days}
            ORDER BY `number` DESC
        ),
        mailings_in_range AS (
            SELECT mailbox_provider,
            DATE(finished_at) AS send_date,
            recipients AS recipients
            FROM summary_mailingmailboxprovider
        )
    -- Finally, group/sum by date and mailbox provider
    SELECT
        DATE_FORMAT(dir.a_date, "%b %e") as send_date,
        IFNULL(sum(mir.recipients), 0) as sent

    FROM dates_in_range dir
        LEFT JOIN mailings_in_range mir
            ON dir.a_date=mir.send_date
    WHERE mir.mailbox_provider IS NOT NULL AND mir.mailbox_provider = { mailbox_provider }
    group by 1
    order by dir.a_date,mir.mailbox_provider
Then, create a dashboard report:
name: Daily Send Counts by Mailbox Provider
short_name: daily_send_counts_mailbox_provider
description: Sending volume over the last 90 days for each mailbox provider. Can be useful to identify changes in sending volume that can cause deliverability issues.
html:
        {% for mp in "gmail ms charter comcast proofpoint att vmg apple"|split:" " %}
            <h3>{{ mp }}</h3>
            <div class="google-chart LineChart">
                {% report "mailings_sent_by_day_by_provider" with 90 as n_days mp as mailbox_provider %}
            </div>
        {% endfor %}
We may change the SQL or HTML of these reports by the time they’re released, but this report will serve well in the meantime.
How should this report be interpreted?
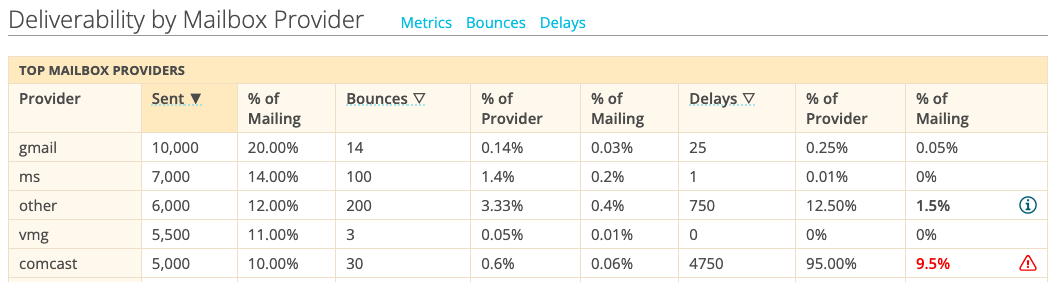
This dashboard can help you identify when you have major changes in sending volume at a mailbox provider that could impact your deliverability. If you see a large increase in sending volume, that may coincide with additional bounces or delays, or even a mailing block at that provider.

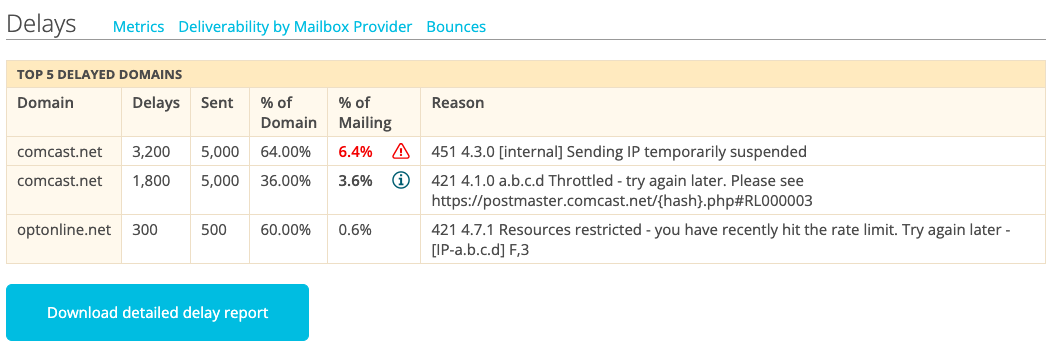
If you see a spike like this in your graph, and it’s a significant increase, you’re probably also seeing increased delays or bounces at that mailbox provider. Prevention is the best cure, but this chart can help you notice the problem early, and address it.