First things first: if you haven’t read our feature spotlight on custom user fields, do that before reading this one!
Custom user fields are powerful, but they’re not much use if the data in them is out of date.
For some custom user fields, they don’t need to be updated regularly. Historical data, like the amount of money a user gave in calendar year 2020, isn’t going to change — it’s over and done. You can import that once and be done.
But if you’re tracking information like “how much money has a user given in this current calendar year?”, you’ll want to keep that information regularly up to date.
Sure, you could do a manual import process every day to update that information manually, but it’s easy to forget, or not have time to do it. Better to automate these types of tedious, time-consuming, error-prone processes.
This is exactly why we created user updaters.
User updaters run the custom user field import for you, using the exact same report you made for your initial custom user field import, and we run them on a schedule that you set.
To get started, first create a report for your custom user field import. Or, if you already created one for your initial import, re-use it!
Next, ensure that your report’s column names match the custom user fields, just like we did in the custom user fields feature spotlight.
Also be sure that you’re only including relevant columns in your user updater report. This means one column to identify your user, like user ID or email, and your custom user field columns.
Here’s an example: lots of clients (mainly political parties and candidates) want to know how much money a user can give before they “max out”. Sure, you could calculate that manually and use it in a merge query, but that could make your mailing take a long time to build.
With a user updater, this information stays up to date behind the scenes, and your mailings build lightning fast.
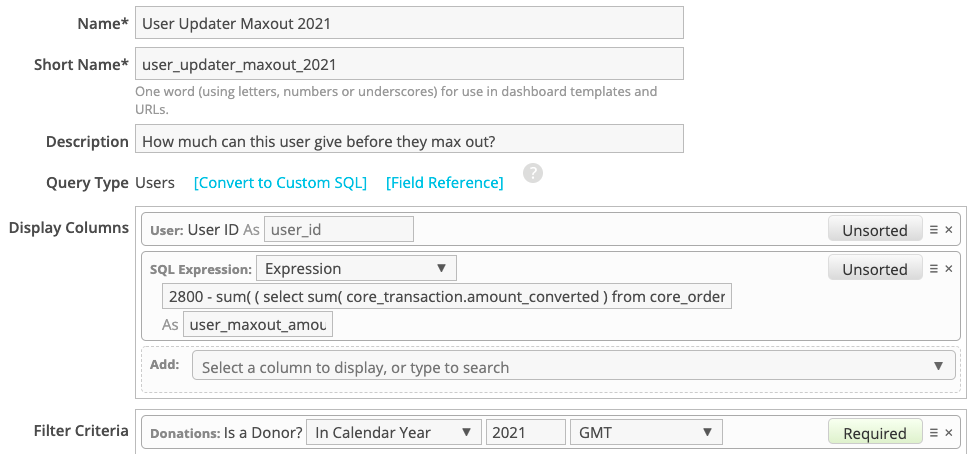
Notice that we have two columns: one for the user ID and another titled user_maxout_amount_2021. If we haven’t yet created a custom user field with the name maxout_amount_2021, we’ll want to do that before continuing any further.
Next, give your report the updater report category and save.
When your report finishes running, confirm that the results look good to you, spot-checking several users to ensure the results.
Next, create your User Updater. From the Users tab, find User Updaters in the sidebar, then create one. You can run user updaters manually, or on a schedule as you prefer.
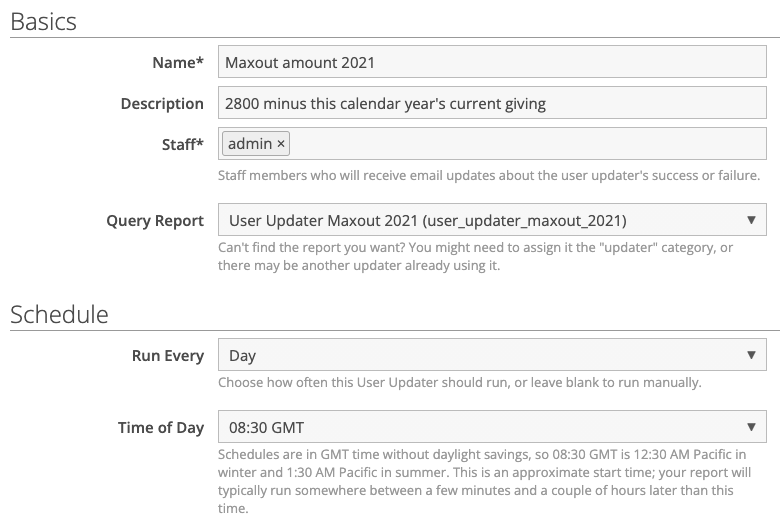
In the screenshot above, I’ve given my user updater a helpful name and description, and I’ve set myself to receive email updates about whether the updater succeeded or failed on each of its runs.
The Query Report is the actual report that runs (and is imported); you’ll only see reports that have the updater category here, and each query report can only be associated with a single updater.
You can run your updaters on a daily, weekly, or monthly schedule as you prefer, or remove the schedule once you no longer need to update the field. For example, once it’s 2022, I won’t need to update the above field anymore, so I can turn off the schedule.
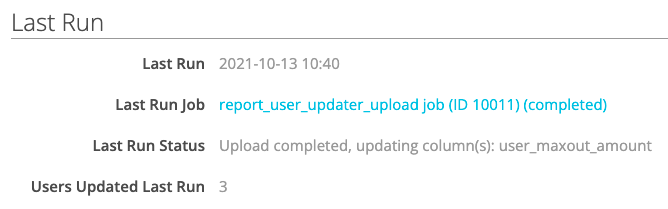
User Updaters will also tell you the last time they ran, whether it succeeded, which columns it updated, and how many users were updated as part of the run:
Keep in mind, user updaters are only used to update custom user fields and user groups!
Check out a video version of this blog post, plus our feature spotlight blog posts and videos on custom user fields and user groups for more great tips!
Interested in scheduling a demo with ActionKit? Let us know!