Customizing your ActionKit Home page

ActionKit’s staff announcements are great for reminding staff of new processes, monthly goals, and weekly priorities. And the Pre-flight dashboard can display a checklist of everything you need to do before sending a mailing and reduce mistakes by automating lots of things you’d check for manually.

You can also customize the “Your Progress” dashboard report to offer exactly this kind of valuable just-in-time help as well as running other kinds of reports that staff might find useful.
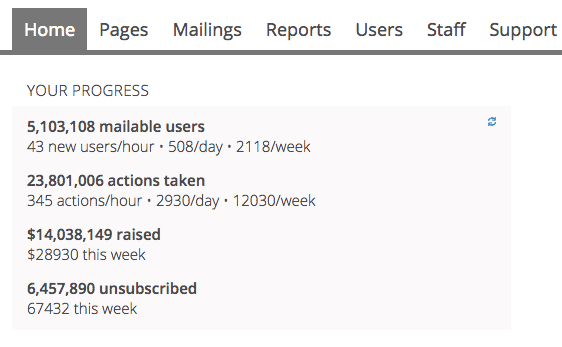
The “Your Progress” dashboard appears on the home page of ActionKit and displays some top-level stats about your all-time actions and users

Let’s start by adding some resources to the top of the report. First, from the Reports tab, browse for and begin editing the your_progress report.
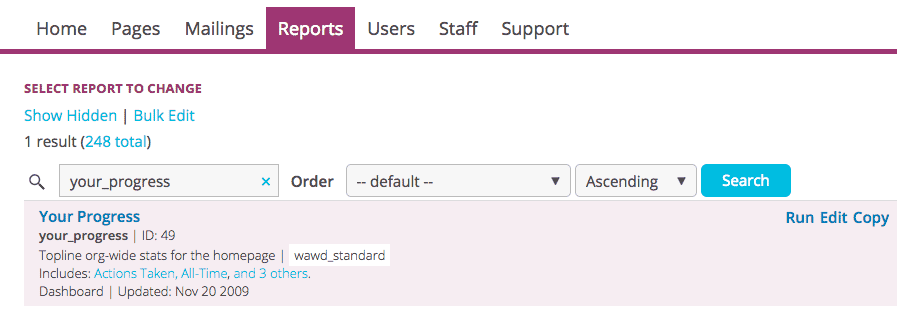
Browsing for the your_progress report
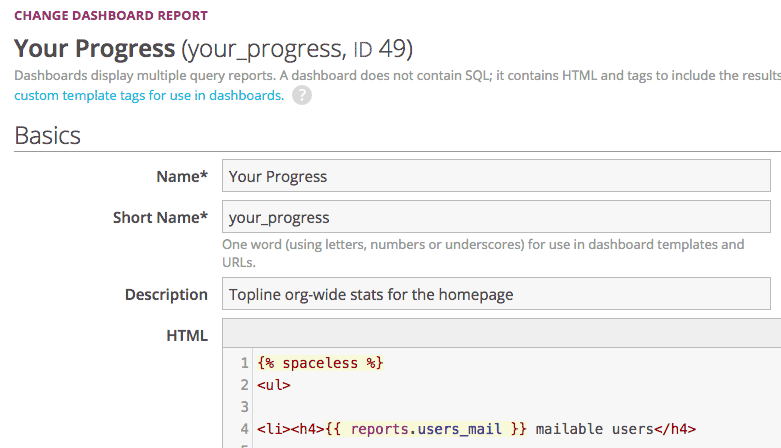
Your your_progress report will look a little something like this

Let’s add this code just above the {% spaceless %}  tag.

<h3 style="background-color: #f3642f; color: white; padding: 10px;">ActionKit resources</h3>
<ul style="margin-left: 10px;">
<li><a href="https://roboticdogs.actionkit.com/docs/manual/guide/index.html" target="_blank"><b>Campaigner's Guide</b></a></li>
<li><a href="https://roboticdogs.actionkit.com/docs/manual/developer/wmd.html" target="_blank"><b>Database Reference</b></a></li>
<li><a href="https://roboticdogs.actionkit.com/docs/manual/faq.html" target="_blank"><b>Frequently Asked Questions</b></a></li>
<li><a href="https://roboticdogs.actionkit.com/docs/manual/tutorials/index.html" target="_blank"><b>Tutorials</b></a></li>
</ul>
<br>

Save your report and head back to the ActionKit home page to see your customized dashboard.
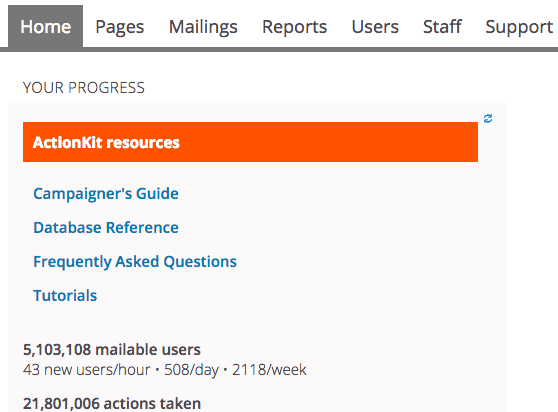
The “Your Progress” dashboard now has our newly-added resources up top

If you have your own staff trainings, helpful links, or resources that staff frequently use, you can add them here and customize it any way you like! Do you have a mailing calendar that all staff use? Add a link to it here!

Beyond adding resources, you could add more reporting that might be helpful. Here are some ideas to get you started:

  • What are the draft mailings we have today? What’s been scheduled, and what’s already sent?
  • What mailings are scheduled for this weekend?
  • How many people haven’t received a mailing yet today?
  • What events do we have coming up, and what do their recruitment numbers look like?

Just be sure to keep it high-level; this dashboard is best for at-a-glance information. And keep in mind that this dashboard won’t load until all of its reports have run, so don’t use this section for long-running reports.

Creating staff announcements

As we saw in Customizing your Pre-flight Dashboard, having reminders built in to your normal workflow can reduce mistakes and provide just-in-time help right where you need it.

For time-sensitive or one-off reminders, announcements are a great way to do this since they appear at the top of every page in ActionKit.

In the upper-right corner of any page on ActionKit, click the gear that has your name to open the settings menu, then go to Announcements.

Navigate to Announcements from the settings menu under the search bar

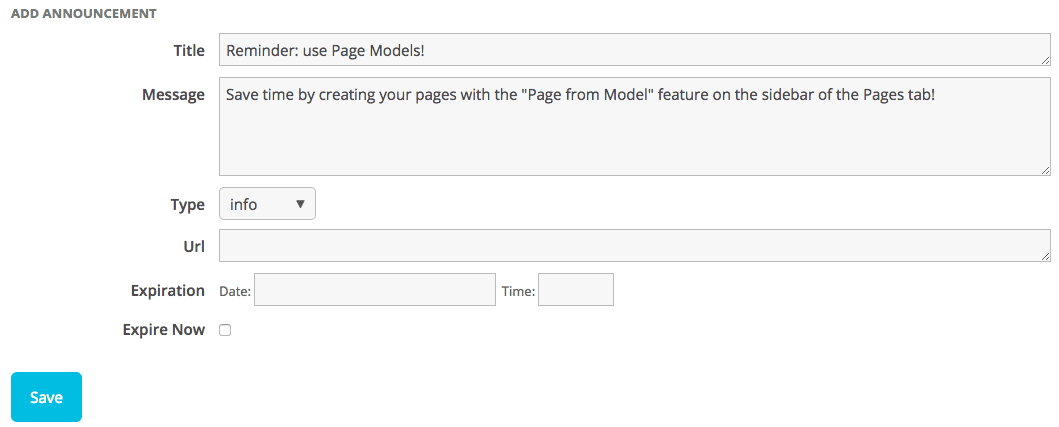
On the announcements page, set your title and message. You can include a link and change the severity of your message (informational, warning, or critical) which changes the color of the display box.

Adding a new announcement

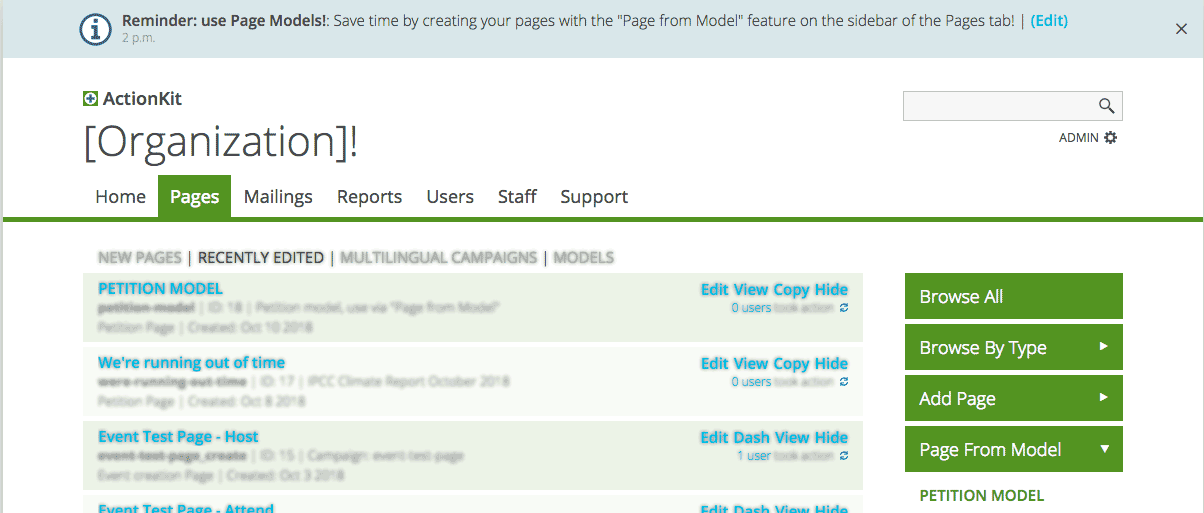
Once you click save, all staff members who are logged in will see your announcement at the top of every page in ActionKit. Staff members can dismiss these messages for themselves once they’ve read them by clicking the X on the right of the announcement.

Our announcement appears at the top of every ActionKit page so all logged-in staff can get timely reminders

Use announcements to remind staff about monthly goals, weekly priorities, changes to work processes, or anything else you can think of!

Customizing page styling

ActionKit gives you full control over the look and feel of your pages so all of your pages look exactly the way you want them, with your branding.

Sometimes you’ll want to make one-off changes to the layout and styling of one page without affecting the way your other pages look. If you’ve found yourself wanting to add custom CSS to a page to change how a page looks (especially to use with ActionKit’s built-in A/B testing!), read on.

(One-time) Create a custom page field

Custom page fields allow you to change the layout or functionality of your pages on a page-by-page basis.

From the Pages tab, choose Other > Custom Page Fields from the sidebar. You’ll then be able to see any custom page fields you have already created.

Let’s add a new custom page field. This is something that you’ll set up once — and then you’ll be able to use it again and again on lots of pages.

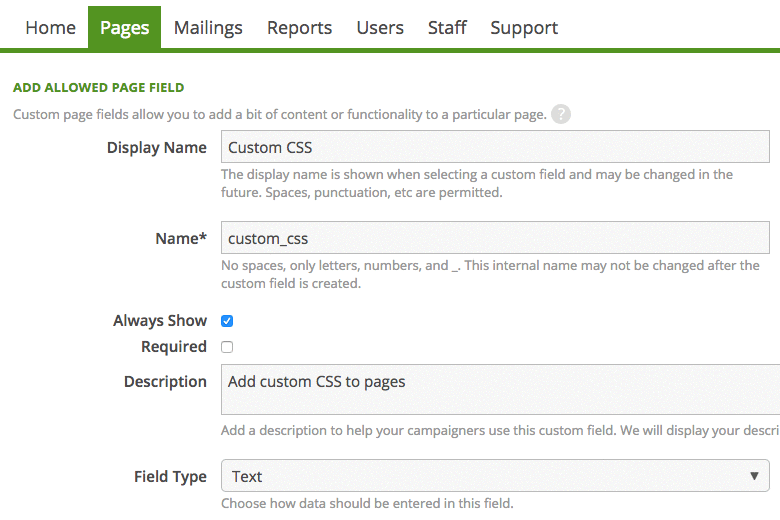
Creating a new custom page field, custom_css

Here, we’ve created a custom page field with the name “Custom CSS” and the description “Add custom CSS to pages.” We’ll use the “Text” field type.

(One-time) Add the custom page field to your templateset

Like creating a custom page field above, this is a one-time setup step that will help us to customize our pages easily once we’ve set it up.

Caution: Editing templatesets will change the look and feel of every page that uses that templateset, so when making changes to your templatesets, use the Preview feature and test lots of pages to make sure everything looks correct!

From the Pages tab, choose Appearance > Templatesets from the sidebar. You’ll then see all of the templatesets your organization is using.

Find the templateset you want to change and click Edit. You’ll then see a list of all of the templates available. We want to make this custom page field available on every page, so scroll to the bottom and open wrapper.html.

Search for a closing </style> tag and add this code just above it:


{% if page.custom_fields.custom_css %}
  {{ page.custom_fields.custom_css }}
{% endif %}

If your wrapper.html doesn’t have a closing </style> tag, add this code just above the closing </head> tag:

<style>
  {% if page.custom_fields.custom_css %}
    {{ page.custom_fields.custom_css }}
  {% endif %}
</style>


Preview a handful of pages that use this templateset — they should look completely unchanged, since this code asks: “Does this page have anything in the custom page field custom_css? If so, add it in here!” But it won’t do anything until our page itself has something in the custom page field custom_css. We’ll cover that in the next step.

Once you’ve tested several pages and you’re confident that your changes to your templateset didn’t break any existing pages, go ahead and publish your changes.

Note: if you use multiple templatesets and want to add this functionality to each of them, repeat this step for each templateset.

Add the custom page field to your page

Unlike the other steps, this is one you’ll do on each page where you want to customize the styling.

Let’s start with a petition page:

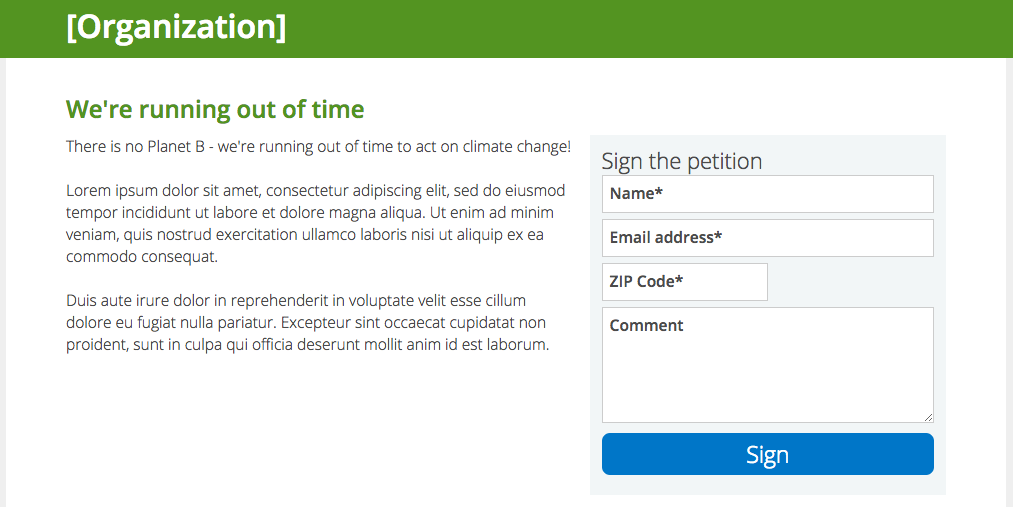
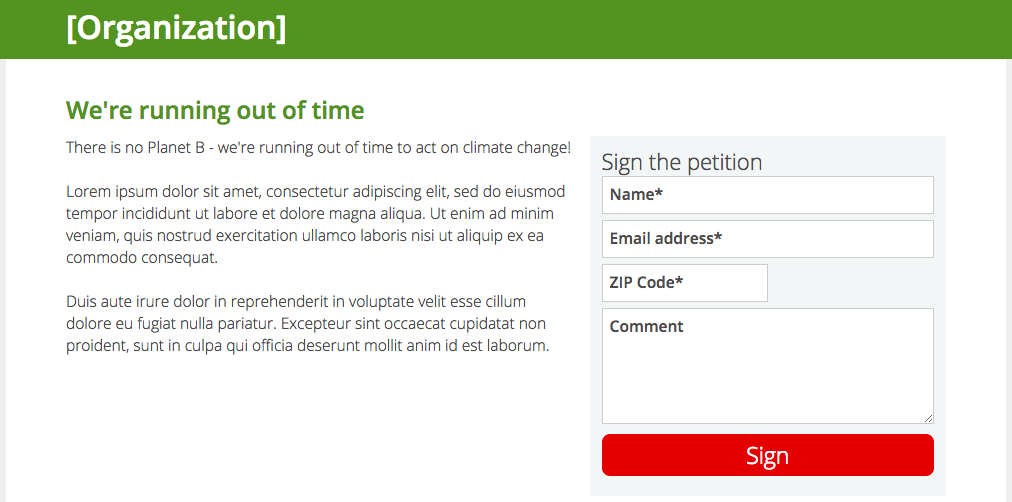
A page; notice the submit button is blue here
Notice the submit button is blue here

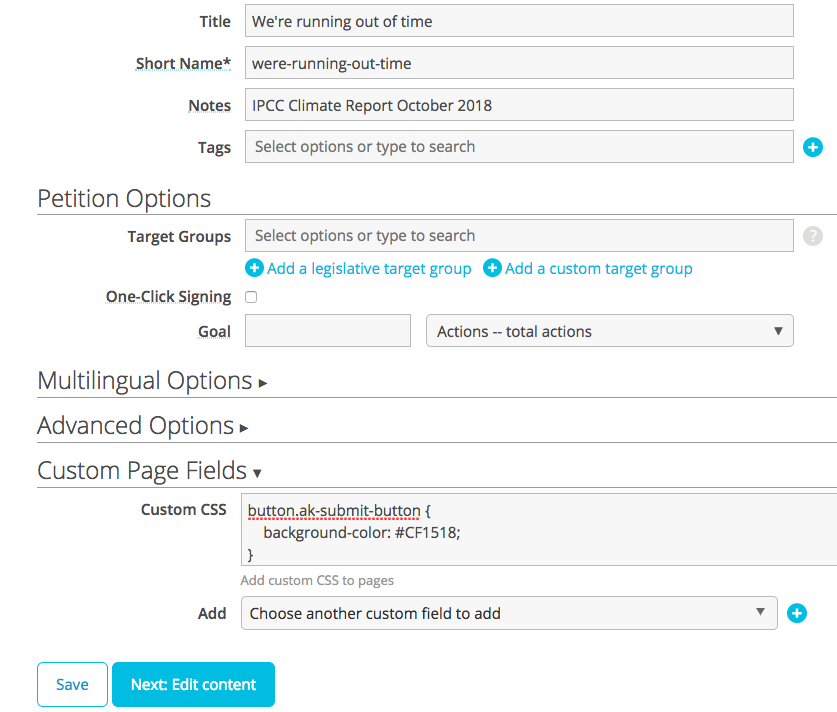
On the Action Basics section of your page, scroll to the bottom and expand the Custom Page Fields, then add the field Custom CSS.

Adding a custom page field to the page

In this example I’ve added some CSS to change the color of the submit button from blue to red.

button.ak-submit-button { 
  background-color: #CF1518; 
}


Once you save your changes, take a look at the page.

And we’ll see that this page, which normally had the submit button as blue, is now red.

The submit button is now red.

This example highlights a very small change, but by adding custom CSS to your templatesets, you’ll be able to change the layout and styling of any element on your page very quickly on the fly, without impacting the way any other pages look.

If you combine this with running A/B tests on your pages, you can A/B test any CSS change you want to see layout and styling changes that drive more actions and donations to your pages.

Customizing your Pre-flight Dashboard

Ever made a mistake? Forget to tag your mailing? Missed a tag? Messed up your targeting? Get a little sweaty before pressing that send button? You’re not alone.

Checklists help pilots and surgeons remember every detail in stressful situations and they can help you too.

ActionKit’s draft_dash dashboard report is perfect for this —  it appears just before the Send button on the Proof and Send screen, and you can customize it to include a wide range of automated checks.

What do I check for?

Chances are, you already have a process for sending a mailing that looks a little something like:

  1. Draft, review, and incorporate edits
  2. Determine best targeting
  3. Get some proofs
  4. Proofread the email carefully
  5. Click all links to ensure none are dead
  6. Take action on your page to make sure it looks good
  7. Make sure everything looks correct on mobile
  8. Take a deep breath and click send

Eight steps is already a lot to remember — and there are so many other things we could check! We remembered to use HTTPS on our links, right? We didn’t forget any mailing and page tags? (I could go on!)

Some of these are things that we need to review manually; others we can check automatically through ActionKit.

If you can write a report for it, you can include it

You already use reports to see how many people took action on your page or opened your mailing. But you can create reports to see other things too, like which tags are associated with a page.

If you set up your tags by tag type, you can also make sure that each page or mailing has at least one tag of every required type. You can also check to make sure that the tags are consistent between your mailing and page.

Many clients use custom page fields to control whether a page shows a 501c3 logo or a 501c4 logo, and you can check for this custom page field too.

Is there a targeting query that you must include (or exclude) with every mailing? You can make sure it’s there!

Reports vs. Dashboards

Reports are built with the Query Builder (or written in SQL) and pull information directly from the ActionKit database.

Dashboards are HTML pages that can pull information from lots of reports at once. draft_dash is a special dashboard — if you create it, ActionKit will put it just above your Send button on the Proof and Send screen of each of your mailings.

Take a look at the code for the Rolling 12 Month Email Performance Rates Dashboard — you’ll see you can use Django template tags, lots of reports, CSS, and Javascript in your dashboards to make them powerful and flexible.

Start small

Even if you only added a bulleted list of your mailing process to the draft_dash dashboard, it would still go a long way toward reducing mistakes since that’s the last thing campaigners see before clicking the send button.

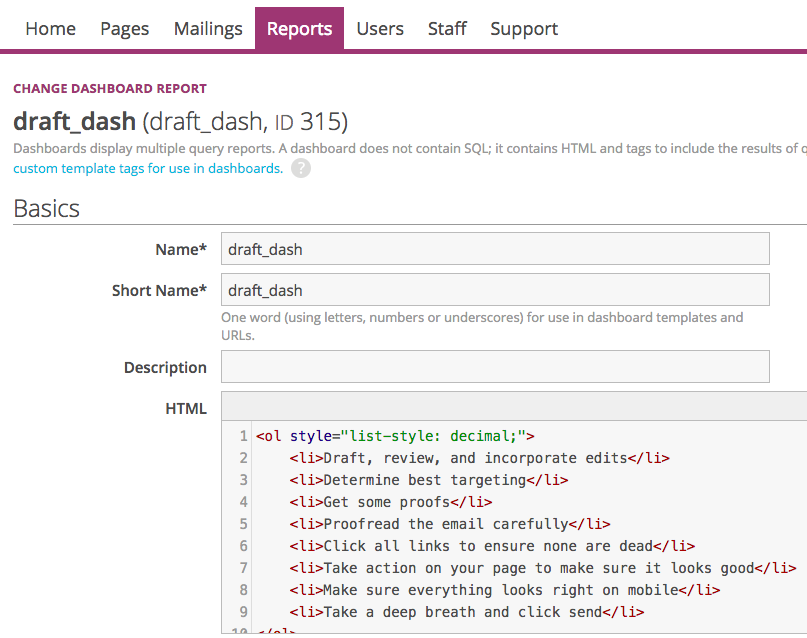
draft_dash dashboard report
Creating a new dashboard report, draft_dash and adding our checklist
<ol style="list-style: decimal;">
	<li>Draft, review, and incorporate edits</li>
	<li>Determine best targeting</li>
	<li>Get some proofs</li>
	<li>Proofread the email carefully</li>
	<li>Click all links to ensure none are dead</li>
	<li>Take action on your page to make sure it looks good</li>
	<li>Make sure everything looks right on mobile</li>
	<li>Take a deep breath and click send</li>
</ol>
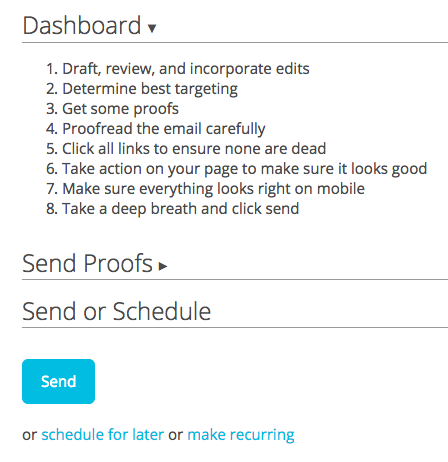
What our dashboard looks like on the Proof and Send screen of our mailings

Next, let’s create a report that will make sure a campaigner has written something in the mailing’s notes field. The notes field is a great way to know what a mailing is about without having to open it and read the whole thing, so we don’t want to leave it blank.

When browsing our mailings, the notes field is helpful to figure out what a mailing is about

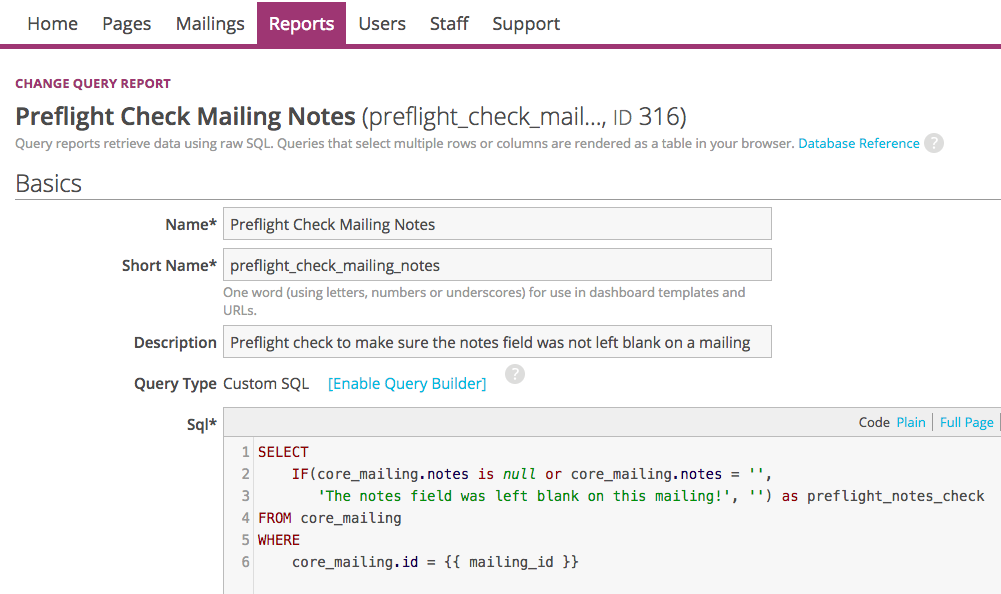
Let’s create a new Custom SQL report to check to see if the notes field was left blank.

If the notes field is blank, we’ll get a warning. Otherwise, nothing shows up - we’re good to go!
If the notes field is blank, we’ll get a warning. Otherwise, nothing shows up – we’re good to go!
SELECT
    IF(core_mailing.notes is null or core_mailing.notes = '',
	   'The notes field was left blank on this mailing!', '') as preflight_notes_check     
FROM core_mailing
WHERE
    core_mailing.id = {{ mailing_id }}

Notice how in line six we use {{ mailing_id }}. When using this with the draft_dash dashboard, ActionKit will automatically fill this in with the mailing you’re viewing.

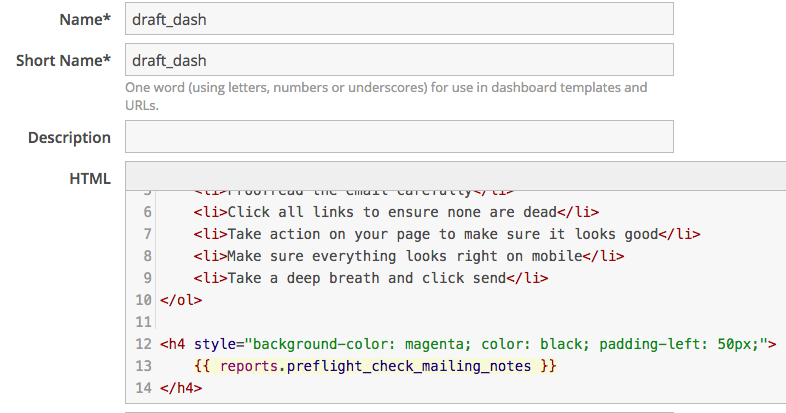
Now we can use this SQL report we just created in our dashboard. Here I’ve added it under the checklist we already had:

Adding in the report we just created to the dashboard
<h4 style="background-color: magenta; color: black; padding-left: 50px;">
	{{ reports.preflight_check_mailing_notes }}
</h4>

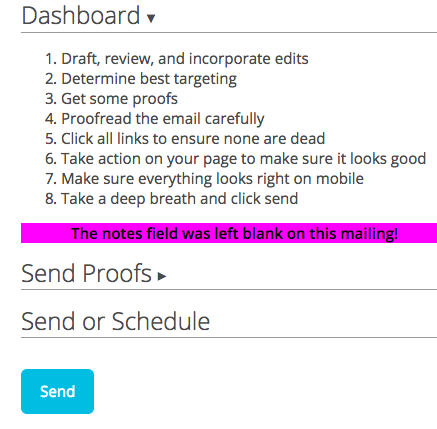
Remember: if there’s something in the notes field, then nothing will show up here. If the notes field is blank, then the message “The notes field was left blank on this mailing!” will appear against a bright magenta background.

Results for draft_dash on a mailing with a blank notes field

These reports are included as a suggestion to help you get started. You can build on this little by little, adding in checks as you go. For best results, make sure that staff is trained on how to use the dashboard and knows how to refresh the report once they’ve made changes. And once staff get used to the dashboard, they’ll find the extra checks and reminders useful, catching mailing mistakes you might have missed before!


A Tagging System that Works

(Updated April 2021 to show examples of using named prefixes rather than symbols, and emphasizing using multiple tags)

ActionKit has many built-in ways to see the performance of your mailings. The Rolling 12-month Email Performance Rates report is one of my favorites for showing how your overall performance is trending.

But do you ever wonder how well specific types of mailings perform? By default, your Rolling 12-month Email Performance Rates report shows the combined performance of every mailing you’ve sent. But petitions perform differently than call alerts and fundraising appeals. While it’s good to get a big-picture view, sometimes we need to take a different approach.

ActionKit’s built-in reports will answer questions like “What’s the average click rate of our mailings?” But maybe we have other questions, like:

  • What’s the average click rate of our petition mailings?
  • What’s the average click rate of our fundraising mailings?

What are tags, anyway?

Tagging your pages and mailings makes answering these questions easy. Tags can be used to describe pages and mailings in a way that can be used in analyzing your data, like to differentiate a petition mailing from a fundraising mailing.

Clients who work on a variety of issues might create a tag for different issues, to differentiate between how well an immigration mailing performed compared to a mailing about the Supreme Court. Or to see that mailings sent to a random sample of your list won’t perform as well as a mailing sent to your most active members.

You could create a tag for each of these different situations and apply them to your pages and mailings, then analyze your performance on a per-tag basis.

Grouping tags together

The tags themselves also have context and meaning, so it makes sense to group them.

Pages and mailings have lots of different categories that you could associate with them, like:

  • Purpose (petition, call, letter to the editor)
  • Issue (immigration, Supreme Court vacancy, climate)
  • Audience (random sample, most active)

UltraViolet (inspired by SumOfUs) created prefixes for each type of tag to group similar tags together. For instance, the purpose of a mailing or page became *petition and *call; the issue became #immigration and #climate; the audience was @random and @active.

Grouping these tags together with a prefix meant that they were sorted with similar tags, and best of all, campaigners didn’t have to remember all of the different tags, just the different prefixes, and autocomplete would do the rest.

Suggested tags

You’ll want to customize the tags and tag types that work for you, but here are some suggestions:

Type of Tag Description Examples
*Purpose How are you asking members to take action? *petition, *call, *lte, *share, *fundraiser
#Issue What is the issue area(s) or reason you’re sending this? #immigration, #climate, #healthcare, #abortion
&Moment Is this related to a specific, high-energy moment? &obamacare, &kavanaugh, &familiesbelongtogether
@Audience What is the targeting / who are you sending this to? @actives, @random, @everyone
!Target Who are you trying to move? !corporate, !media, !congress
$c3/c4 Is this a 501c3 or 501c4 action? $c3, $c4
%Mailing phase Is this a test, a full-list send, or a kicker mailing? %kicker, %test, %fullsend
-Staff member Who worked on this mailing or page? -Shannon, -Tanya

Suggested alternative

These symbols are good, but even better might be using named prefixes, like topic- or target- or type-.

For example, revising the above to use named prefixes instead of symbols, you could do:

Type of Tag Description Examples
type- How are you asking members to take action? type-petition, type-call, type-lte, type-share, type-fundraiser
issue- / topic- (choose one) What is the issue area(s) or reason you’re sending this? topic-immigration, topic-climate, topic-healthcare, topic-abortion
moment- Is this related to a specific, high-energy moment? moment-obamacare, moment-kavanaugh, moment-familiesbelongtogether
audience- What is the targeting / who are you sending this to? audience-actives, audience-random, audience-everyone
target- Who are you trying to move? target-corporate, target-media, target-congress
entity- Is this a 501c3 or 501c4 action? entity-c3, entity-c4, entity-pac
phase- Is this a test, a full-list send, or a kicker mailing? phase-kicker, phase-test, phase-fullsend
staff- Who worked on this mailing or page? staff-Shannon, staff-Tanya

Never too late

It might seem daunting to try a new system if you’ve never set up tags before, or if you’ve been tagging your pages and mailings a different way for years, but here are some tips that can help ease the transition:

  • Start by renaming your tags to conform to your new system
  • Train all staff who use ActionKit on the new system and incorporate feedback into the plan.
  • Triage the most important pages or mailings to go back and tag under the new system, starting with the pages with the most actions and mailings with the most recipients.
  • Everyone work together through the backlog, preferably at the same time so you figure out the nuances between your different tags and achieve some level of shared agreement about what each tag means. This is a really important step, so don’t skip it!  

Consistency is key

The whole point of doing all this is to be able to analyze data in creative ways. But reliable, accurate data requires consistent tagging. UltraViolet customized the draft_dash dashboard report to check mailings and pages to make sure they have at least one of the required tags, and reminds staff if they forget. Best of all, the draft_dash dashboard report appears just above the Send button on mailings, so it’s the last thing campaigners see before sending.

Keep it general

Don’t get too specific with your tags! Think about them like movie genres, and remember that a page can have multiple tags, and each tag should be used by many different pages. (If your tags are single-use, it might be better to capture that information in the page or mailing’s description).

Think about your tags like one fact describing the page or mailing. To continue the movie genre analogy, a good tag for movies would be “Comedy” or “Horror”. Movies like Parasite (2019) would have both tags, and it wouldn’t be as useful to create a third tag called “Comedy/Horror”, in part because there would be very few movies with that third tag, and because having the third tag doesn’t tell you any more information that the first two tags didn’t.

Sample questions

Here are some questions you could answer using the suggested tags above:

  • Do mailings with corporate targets have a higher click rate than mailings with congressional targets?
  • How does the performance of a kicker compare with a regular full-send mailing?
  • Are there specific issues that are more motivating to our member base? (Try to think of issues as broadly as you can. Even groups focused on a single issue will have issue sub-categories.)
  • What is the average performance of our mailings and pages by type?

Depending on how you set up your tags, you’ll be able to answer these and many others!