In Fundraising in ActionKit? Don’t forget these tips! we showed how you can use suggested ask rules to show personalized donation suggestions.
But that’s not the only way to do this! Lots of clever clients have developed other ways to show personalized suggestions, and those are worth a mention here too.
Many of these tips are explained in detail in our Intermediate Mailings training, which you may find useful!
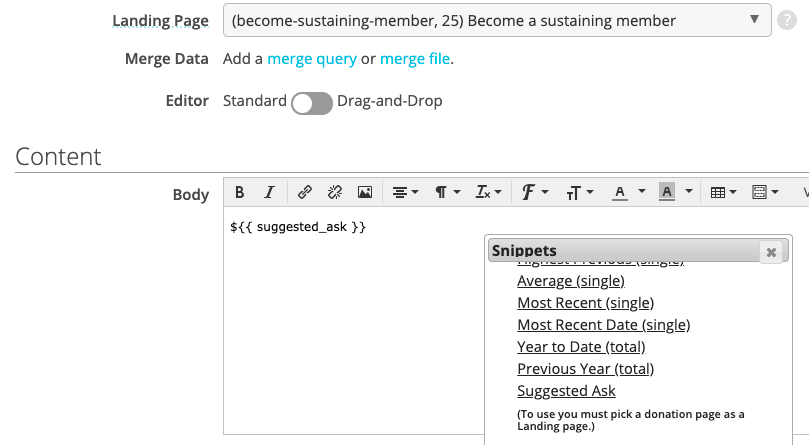
Some clients like to use the {{ donations.highest_previous }} snippet in their mailings, along with the |multiply filter in order to show different potential giving levels.
Assuming someone has given previously, the {{ donations.highest_previous }} snippet will show the highest one-time donation they’ve given before.
When to use requires_value
To restrict your mailing to ONLY those who have given previously, use the {% requires_value donations.highest_previous %} snippet. If you use this, you’ll also want to adjust your targeting to make sure your mailing only goes to previous one-time donors.
But you don’t have to use the {% requires_value donations.highest_previous %} snippet. In fact, there’s a good argument to be made that even if someone hasn’t given before, you still want to make an ask! Suggested ask rules do a good job of covering this situation, but this post is all about other ways of approaching the same problem. In this case, you’ll want to remove the {% requires_value donations.highest_previous %} snippet from your mailing.
Adding donation levels
Using the |multiply filter, we can show a higher (or lower) amount than the user’s highest previous one-time donation.
For example, {{ donations.highest_previous|multiply:1.5 }} will multiply a user’s highest previous one-time gift by 1.5. If someone’s highest gift before was $10, this snippet will show $15.
You can use as many of these different levels as you like in your mailings, to offer a set of choices. Use the amount={{ donations.highest_previous|multiply:1.5 }} and prefill=1 URL parameters when creating links in your mailings.
Get lots of previews and proofs
Let’s say we have a user whose highest previous one-time gift was $10, and we want to show them a multiple of 1.25 to ask them for $12.50.
Using the {{ donations.highest_previous|multiply:1.25 }} snippet looks wrong though: instead of $12.50, we see $12.5 in the preview.
Getting lots of previews and proofs is so important — it’s the only way you’ll be able to notice these sorts of oddities.
To fix this so you can properly display cents even when the last digit is a zero, use the |floatformat:2 filter. This tells ActionKit “I expect this to be a ‘floating point number’ (also known as a decimal number), so always round it to two digits.”
You’ll want to apply this to all of your donation snippets that use |multiply, even if you don’t notice problems with them. (Depending on the initial values and how you’re multiplying, you might see problems, or you might not).
So you’ll end up with: {{ donations.highest_previous|multiply:1.25|floatformat:2 }} – it’s important that the floatformat comes last (is the rightmost filter), because otherwise it may not do anything.
Re-using variables
Behind the scenes, ActionKit does a database calculation every time you use the {{ donations.highest_previous }} snippet (and some other snippets, too). That’s fine, but if you use that snippet more than a few times in your mailing, you might want to switch to another way of using it, or your mailing send speed might be slower than it needs to be.
Using the {% with %} tag, we can assign the value of {{ donations.highest_previous }} to a variable. In these examples, let’s assign them to the hpc variable.
First, we assign the variable using the tag {% with donations.highest_previous as hpc %} and then at the end of the email, we’ll use {% endwith %} to tell ActionKit we don’t need this anymore.
This also has the added benefit that we don’t need to type {{ donations.highest_previous }} over and over again; we can instead use {{ hpc }} to mean the same thing.
Now we can use our filters on the hpc variable in the same way as before, like {{ hpc|multiply:1.25|floatformat:2 }}.
Rounding to nearest $5 / nearest $10
Using some math tricks, it’s also possible to round to the nearest $5 or nearest $10 if we don’t care about cents.
To round to the nearest $5, use {{ hpc|multiply:0.2|floatformat:0|multiply:5 }}. This uses some math tricks and rounding (notice the floatformat filter is in the center, not at the very end as usual) to get the value we’re looking for.
To round to the nearest $10, use {{ hpc|multiply:0.1|floatformat:0|multiply:10 }}.
It’s also possible to use these alongside other multiplication levels, like an HPC x 1.5, rounded to the nearest $10: {{ hpc|multiply:1.5|multiply:0.1|floatformat:0|multiply:10 }}.
There’s lots more tricks you can use to ask for different donation amounts from your users — whether you’re using suggested ask rules or not, ActionKit has lots of ways to personalize your mailings!