Facebook pixels allow you to track your visitors’ activity on your website. You can view user activity in the Facebook Analytics dashboard and many clients use pixels to see how effective their ads are, tracking activity like viewing a page or making a donation.
You can use Facebook pixels on your ActionKit pages as well! Since each pixel is customized to the specific page and events you’re looking to track, the way we will set things up in this blog post will show how to add a different Facebook pixel to each page.
In a previous blog post, Customizing Page Styling, we created a custom page field and edited our templateset to be able to customize the CSS on our pages however we liked. (If you haven’t edited your templatesets before or created custom page fields, check it out!) We’ll be using the same concepts here.
(One-time) Create your custom page field
Custom page fields allow you to change the layout or functionality of your pages on a page-by-page basis. In this case, custom page fields will allow you to add the necessary Facebook pixel code onto your pages.
From the Pages tab, choose Other > Custom Page Fields from the sidebar. You’ll then be able to see any custom page fields you have already created.
Let’s add a new custom page field. This is something that you’ll set up once — and then you’ll be able to use it again and again on lots of pages.
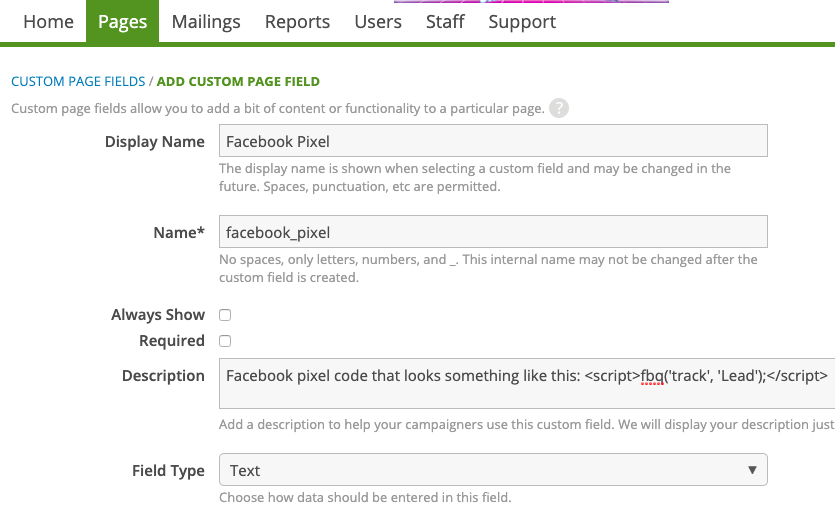
Here, we’ve created a custom page field; lets walk through each piece:
- Use the name “facebook_pixel”
- Use the display name “Facebook Pixel”
- Use the description “
Facebook pixel code that looks something like this: <script>fbq('track', 'Lead');</script>” or a similar description to help your colleagues know what to put there. - Even though this is technically a bit of Javascript code, be sure to use the “Text” field type (if we used HTML as the field type, we’d get an HTML editor with text formatting options, which would cause problems later).
(One-time) Add your custom page fields to your templateset
Like creating your custom page fields above, this is a one-time setup step that will allow you to add a Facebook pixel on any of your ActionKit pages.
Caution: Editing templatesets will change the look and feel of every page that uses that templateset, so when making changes to your templatesets, use the Preview feature and test lots of pages to make sure everything looks correct! Importantly, the changes you’re making in this blog post, if done correctly, should not result in ANY visible change to your pages.
From the Pages tab in ActionKit, choose Appearance > Templatesets from the sidebar. You’ll see all of the templatesets your organization is using.
Find the templateset you want to change and click Edit. You’ll see a list of all of the templates available. We want to make this custom page field available on every page, so scroll to the bottom and open wrapper.html.
Next, we’ll need the Facebook pixel code. (If you haven’t yet created a Facebook pixel, follow the instructions here.) You can find the pixel base code in the Ads Manager > Events Manager. You can recognize the pixel base code because it starts with <!– Facebook Pixel Code –> and ends with <!– End Facebook Pixel Code –>.
Search for the closing </head> tag in wrapper.html and add the Facebook pixel base code just above it.
Next, find the opening <body> tag and add this code just after it:
{% if page.custom_fields.facebook_pixel %}

{{ page.custom_fields.facebook_pixel|safe }}

{% endif %}
Preview a handful of pages that use this templateset — they should look completely unchanged. These changes alone won’t do anything until our page itself has the Facebook pixel code in the custom page field we created, and Facebook pixels aren’t visible in any case. We’ll cover how to add the pixel code in the next step.
Once you’ve tested several pages and you’re confident that your changes to your templateset didn’t break any existing pages, go ahead and publish your changes.
Note: if you use multiple templatesets and want to add this functionality to each of them, repeat this step for each templateset.
(Each time) Get the pixel code from Facebook and add it to your page’s custom field
When setting up your pixel in Facebook, you’ll need to choose which events you want to track. When you do, you’ll get a snippet of code that you’ll need to put on your page.
Typically the tracking code looks a little something like this: <script>fbq('track', 'Lead');</script> — but there are so many options available for tracking different actions on a page, and you can even make your own custom events.
Once you have that tracking code, open your page in ActionKit and go to the Action basics screen. At the bottom, under Custom Page Fields, add your Facebook Pixel custom page field and paste the tracking code in.
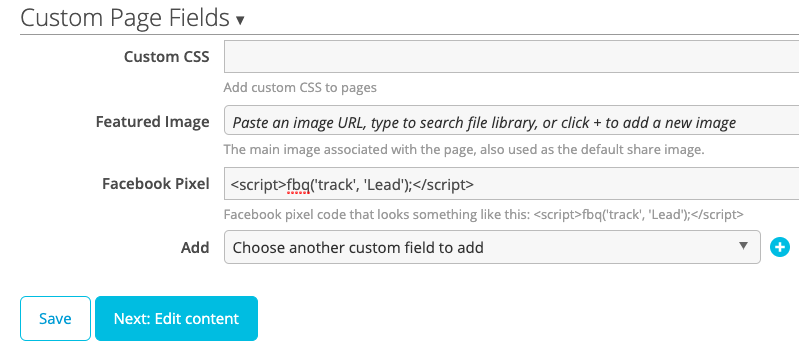
Save your page, then test to make sure your pixel is working correctly. Now you’re ready to use your pixel!
Interested in scheduling a demo with ActionKit? Let us know!